JV PatchEd. – Roland JV-XP Patch Editor

JV PatchEd.
Patch Editor for Roland JV and XP Synths

Windows standalone Patch Editor for Roland JV and XP series.

Patch Editor for Roland JV-1010, JV-1080, JV-2080, XP-30, XP-50, XP-60, XP-80.

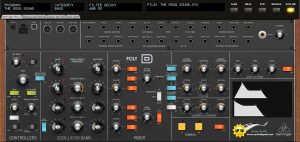
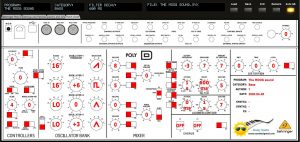
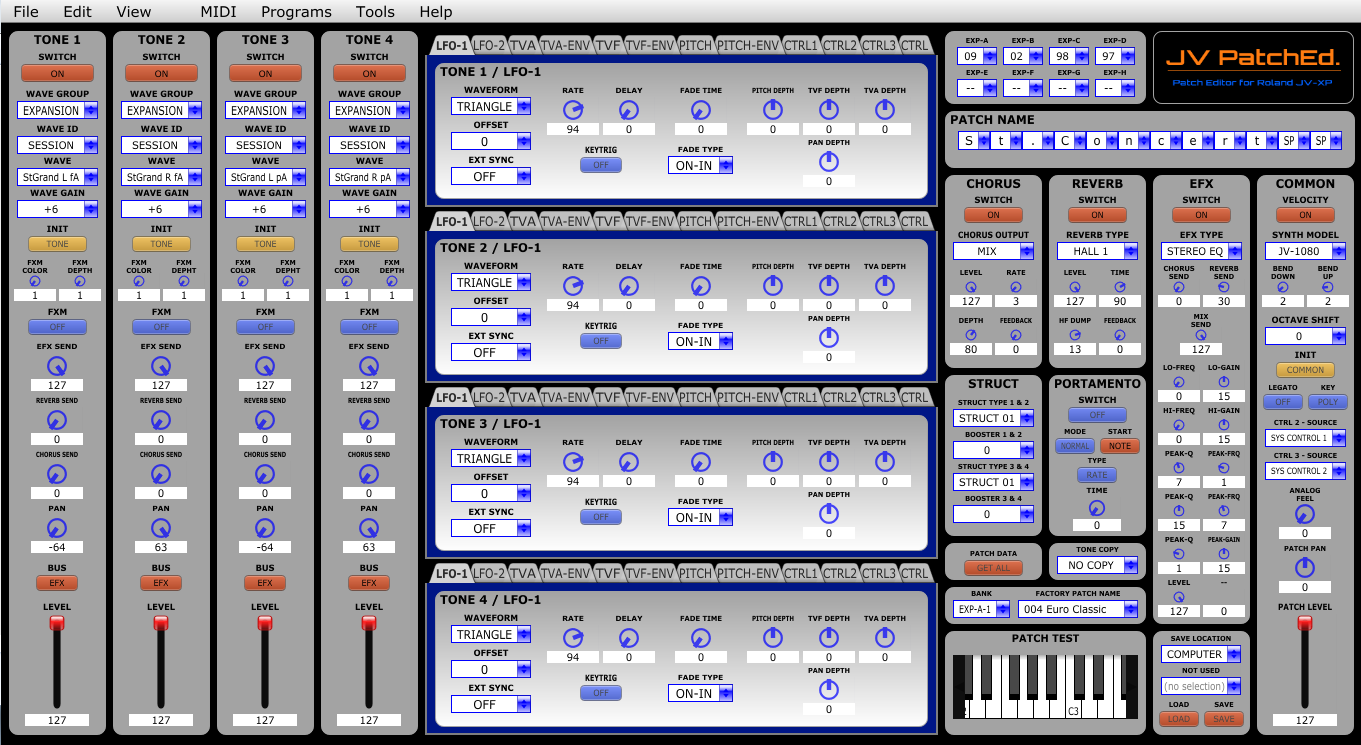
With this panel you will have a complete control of  all Patch Configurations Parameters  on Roland JV-XP series and will really can explore the power of these fantastic synths.

Tone 1 to 4 Wave Set, LFO-1 and LFO-2, TVA, TVF, Pitch, Modulators, Expansion Boards, Common, Reverb, Chorus and EFX parameters will be managed from a single instance with support to expansion cards from series SR-JV80 and PCM-SO1.

All editions will work on Temporary Patch. 

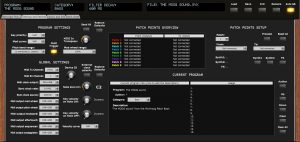
At first time run, just configure your synth model and expansions. This will correctly set the patch lists on your editor and will give you a fast access to any patch from internal or expansion patches.

For start your edition, just select a patch from Factory Patch List and then use this patch as your start reference. All the parameters of patch will be imported by JV PacthEd.

At the end of edition, if you desire, you can store a new patch on Internal User Bank, Data Card or in your computer as sysex file.

Any feedback will be welcome and please, tell me what is your synth. I Hope you enjoy!

JV PatchEd. – JV-XP for Windows Users:

This work was useful for you? This software is free but maybe, you can donate for it!

_______________________________________________________________________________________

 Version History:

JV PatchEd. – JV-XP – Version 1.76 (04/07/2020)

  • Initial Version

JV PatchEd. – JV-XP – Version 1.77 (13/07/2020)

  • Added a “Load” function to load sysex files from computer

JV PatchEd. – JV-XP – Version 1.78 (31/07/2020)

  • Bug correction on Wave Id for Expansion Pop – SR-JV80-01

JV PatchEd. – JV-XP – Version 1.79 (09/08/2020)

  • Bug correction for USB – Midi Controllers

JV PatchEd. – JV-XP – Version 1.80 (13/08/2020)

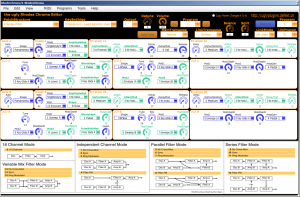
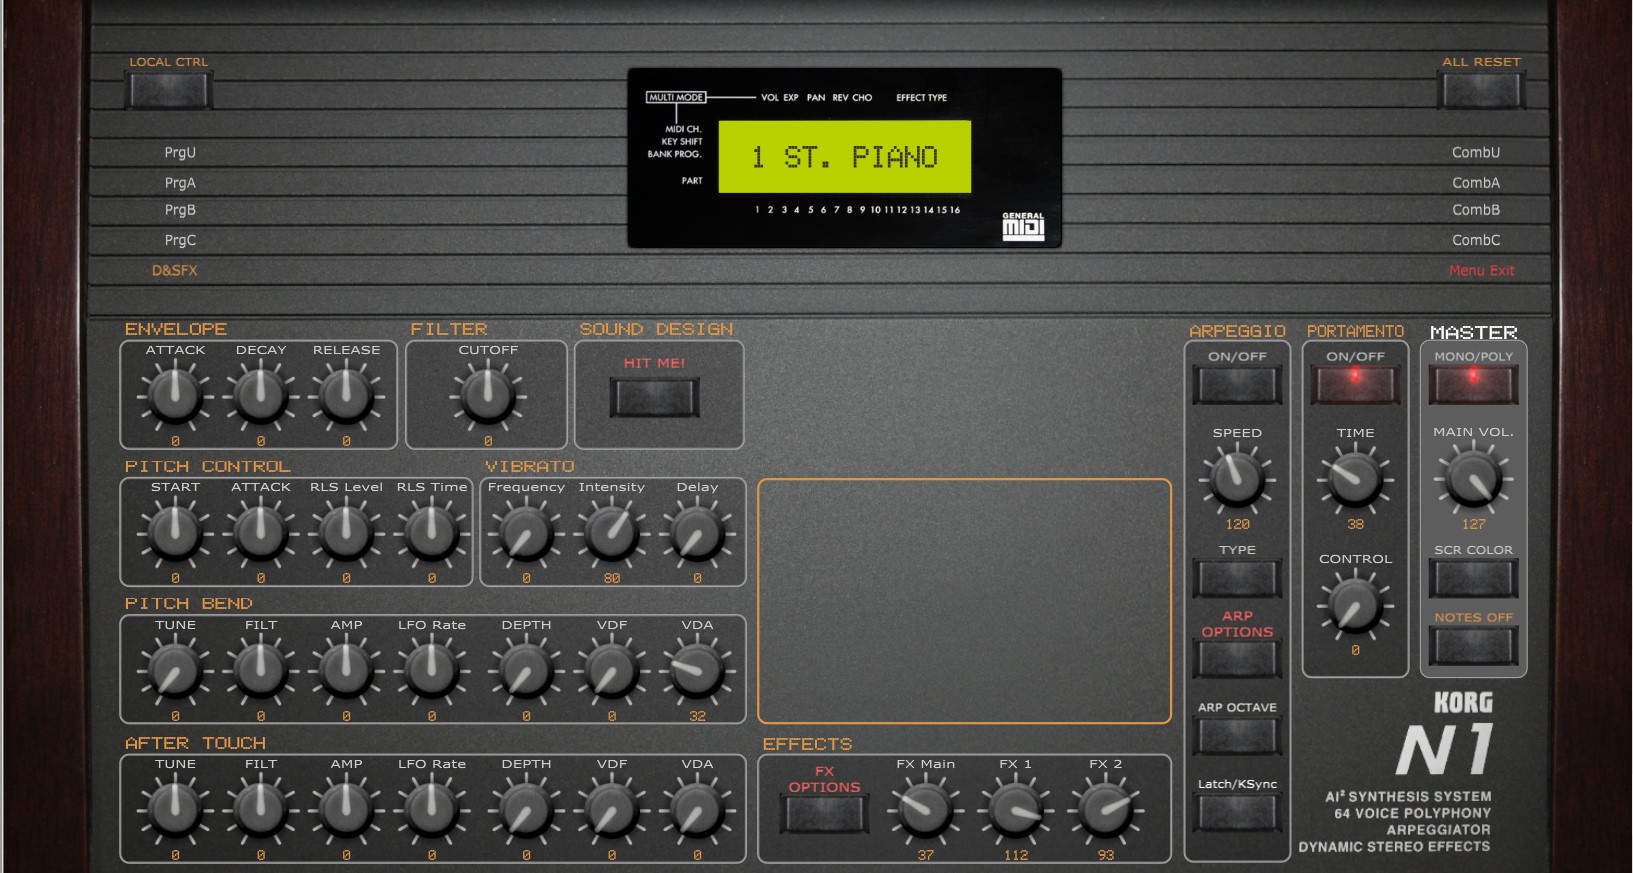
  • Added a “XY Surface” to control at same time Cutoff x Resonance of each tone

https://www.youtube.com/watch?v=umc96GwMPso

Yamaha DX11 Editor

Now Version 4.1 of the Yamaha DX11 Editor with File Browser & Librarian. Built and tested in Ctrlr v5.3.201

The DX11 is very similar in hardware and SysEx to the TX81Z but different enough to warrant it’s own dedicated Editor. The DX11 has in addition to the TZ81Z, an Aftertouch Keyboard, a Pitch Envelope, more Performance Memories, and possibly other minor differences?

Features Added in V3:

  • Performance Editing Tab now added with ability to Sync Internal Patch Names
  • Bank and Preset Selection added
  • Mode Switching now linked to Tab Switching
  • System Tab Added
  • Effects Tab Added
  • Micro Tuning Tab Added
  • Program Change Table Added

New in v4.1:

  • File Browser Added with ability to Save & Load Single Patches in SysEx form
  • Ability to load typical TX81Z 32 Patch Banks found on the Internet

Bugs Fixed in v4.1:

  • Probably lots, I can’t remember now
  • Many LUA Script optimisations
  • If you find anymore please let me know in the comments below and I’ll get on it.

Bugs Fixed in v4.2

  • Restricted Instances would have lots of File Dialogue Windows open on launch, Fixed!
  • When in Poly Mode the Portamento Options would still be visible, Fixed!
  • Cart Bank Selection was visible all the time, now only visible if Cart Bank selected, Fixed!
  • It was possible for the Bank Select on the Panel to get out of sync with the Hardware, Fixed!
  • Redundant graphic files stripped out.

https://1drv.ms/u/s!Apb6P_37oe5eh_oakOmcnkpJFSb0ww?e=XchZuF

Behringer Poly D patch saver

Patch saver for the Behringer Poly D

v1.0 2020-05-01

This panel is only a patch loader/saver on computer as the Behringer Poly D does not support the load/save of programs or the manipulation of program parameters by Midi NRPN/CC messages except for Global settings that can be transferred to the Poly D synth.

It can thus also be called a “patch mapper”.

Features:

  • Behringer Poly D patch saver/loader for PC and Mac
  • Interface with same look as actual synthesizer
  • Top row of support “screens” with old look
  • Visual feedback by using “LED” ring buttons and indication of the parameter value
  • Envelopes graphs handled by mouse or classical ADS rotary encoder and Decay switch
  • Load / Save programs from individual .syx files
  • Easy program renaming
  • Display and export of program parameters as text file
  • Ability to describe 9 input/output patch cables with different sources/destinations
  • Programs have a name, author, save date and description. They can be associated to a category
  • Ability to describe the usage of each program in a step by step mode (up to 15 steps)
  • Browser of the files on the disk
  • Conversion of Sunny Synths’ Model D program files into Poly D ones
  • Patch sheet tab with patch sheet for Poly D and other gear (external synths/sequencer/FX chain)
  • Patch cables (9 colors)
  • Display of current precise parameter value when clicking on rotary encoders
  • Program settings management with automatic/manual send to the Poly D synth
  • Global settings management with automatic send to the Poly D synth (as Behringer Synthtool)
  • Panel zoom with memory
  • Automatic reading of wav files associated to a patch
  • Manual/Automatic reading of any wav file
  • Standalone versions for PC and Mac
  • VST versions for PC (32 and 64 bits)
  • VST and AU versions for Mac
  • All buttons associated to a Midi CC controller number so you can adjust them from a hardware controller (still no impact on the synth of course and unfortunately)

The manual can be downloaded from the Sunny Synths’ drive or website www.sunnysynths.com

For more info on getting this panel, please contact sunny.synths@gmail.com

Additional pictures:


Korg N1

Hello!

I wanna thank you all for help me out making my first panel.

My N1 is an old synth, a 1997 model, from Korg, with one mini screen and a lot of buttons. Inside there are 1300 patches, 600 samples, 48 effects. Something have to be done. Two clicks later, I’m on my way to discover Ctrlr. NICE!

It was not an easy task. Bugs bugging me all the time. But in the end I was smart enough to predict were one could occur, so lots of them were exterminated! 🙂

My final panel in the Ctrlr don’t have bugs, indeed. But my standalone as. My uilistboxes don’t unselect. No problem, I’m not perfect either.

I was no experience in Lua, nor enough kwnoledge in MIDI and I’m not a designer, but I think that, in the end, it is a nice panel. A one week, sleeping fast, job.

I cannot upload it in the dashboard – maybe there is some internet problem -, so I upload it to my Drive! I hope you open it and enjoy it – even if don’t have the keyboard. Just follow the GoogleDrive’s link.

Thanks a lot, guys!

João Marco
https://drive.google.com/open?id=1MPIt7BMePI9O7MRnZ-qfvMxxEXlD_lT2

Behringer Neutron patch saver

Patch saver for the Behringer Neutron

v1.3 2020-03-15

This panel can also be called “advanced patch mapper” and is not a full patch loader/saver as the Behringer Neutron does not support the load/save of programs or the manipulation of all its program parameters by Midi NRPN/CC/Sysex messages except for about 40 of them (documented on p27 and 28 of the manual).

In comparison to the Sunny Synths’ Model D and Grandmother panels, this Neutron panel is thus offering much more possibilities of exchange between the synth and your PC or your controller thanks to the addition of the Neutron OS 2.0.

Features:

  • Behringer Neutron interface with similar way of working as actual synthesizer.
  • Panel background adapted based on “Red” overlay from Heinakroon
  • Top row of support “screens” with old look
  • Visual feedback by using “LED” ring buttons and indication of the value (on change or on click)
  • “Intelligent” display following parameters selection: OSC and LFO shape blending, LFO shape order change with or without blend
  • All “hidden” 2.0 available for easy visualization and tweaking
  • Bi-directional behavior when using the synth or a controller (only for parameters indicated in p27 and 28 of the Neutron manual)
  • Envelopes graphs handled by mouse or classical ADSR rotary encoders
  • Load / Save programs from individual .syx files
  • Global settings management
  • Easy program renaming
  • Display and export of program parameters as text file
  • Ability to describe 9 input/output colored patch cables with different sources/destinations
  • Programs have a name, author, save date and description. They can be associated to a category
  • Browser of the files on the disk
  • Patch sheet tab with patch sheet for Neutron and other gear (external synths/sequencers)
  • Automatic reading of wav files associated to a patch (in file browser)
  • Manual/Automatic reading of any wav file (in file browser)
  • Standalone versions for PC and Mac
  • v1.3: VST versions for PC (32 and 64 bits)
  • v1.3: VST and AU versions for Mac

The manual can be downloaded from the Sunny Synths’ drive or website www.sunnysynths.com

For more info on getting this panel, please contact sunny.synths@gmail.com

Additional pictures:


Behringer Model D patch saver

Patch saver for the Behringer Model D

v2.6 2020-02-29

This panel is only a patch loader/saver on computer as the Behringer Model D does not support the load/save of programs or the manipulation of program parameters by Midi NRPN/CC messages except for Global settings that can be transferred to the Model D.

It can thus also be called a “patch mapper”.

Features:

  • Behringer Model D patch saver/loader for PC and Mac
  • Interface with same look as actual synthesizer
  • Top row of support “screens” with old look
  • Visual feedback by using “LED” ring buttons and indication of the parameter value
  • Envelopes graphs handled by mouse or classical ADS rotary encoder and Decay switch
  • Load / Save programs from individual .syx files
  • Easy program renaming
  • Display and export of program parameters as text file
  • Ability to describe 9 input/output patch cables with different sources/destinations
  • Programs have a name, author, save date and description. They can be associated to a category
  • Browser of the files on the disk
  • Patch sheet tab with patch sheet for Model D and other gear (external synths/sequencers)
  • Patch cables (9 colors)
  • Display of current precise parameter value when clicking on rotary encoders
  • Global settings management with automatic/manual send to the Model D synth
  • Panel zoom with memory
  • Automatic reading of wav files associated to a patch
  • Manual/Automatic reading of any wav file
  • Standalone versions for PC and Mac
  • VST versions for PC (32 and 64 bits)
  • VST and AU versions for Mac (v2.6)
  • All buttons associated to a Midi CC controller number so you can adjust them from a hardware controller (still no impact on the synth of course and unfortunately)

The manual can be downloaded from the Sunny Synths’ drive or website www.sunnysynths.com

For more info on getting this panel, please contact sunny.synths@gmail.com

Additional pictures:


Kawai K3 / K3m Editor Panel Version 1.3

This is a one way editor panel for Kawai K3 and K3m synthesizers and includes the ability to preview and generate the additive waveform.

Download Latest Version 1.3

UPDATE FEB 2020 – Version 1.3

  • Additive waveform now automatically sent when changing patches in Ctrlr’s library
  • Removed “Resend” button as its not needed anymore. Use “Send Snapshot”
  • Reduced background image size so it can be included within uploaded panel.
  • Included some presets I have made 😉

Instructions for using the panel

This panel is designed for use as a one way editor and is designed around using Ctrlr’s MIDI library to store presets. The advantage of this is that each preset can include a different additive wave! As a bonus, I have included some of the presets I have made with this editor.

The synth must have “Protect” turned off in order to use the Additive Waveform Generator and Mono mode. As these work by overwriting data in the synth, you will loose preset data.

Please ensure you have any presets you want to keep backed up before using this panel.

To use the wave generator, the H sliders set the harmonic and the I knobs set the intensity. Your changes are sent to the synth automatically. It’s possible to hold a note down on the keyboard and change the dials and sliders and hear the tone change accordingly.

Remember to set OSC WAVE to 32 to hear the additive waveform.

A harmonic set to zero will signal to the synth that there are no more harmonics. For example, if you set values for Harmonic 1 and Harmonic 3 but set Harmonic 2 to zero, only Harmonic 1 would be recognised by the synth. Harmonics 2 to 32 would be ignored.

There is also a preview of the waveform generated which provides some additional feedback. As you can see in the screenshot below, the preview is very close to the actual output from the synth. Differences will exist due to the analogue circuitry and how the waveform is computed by the synthesizer.

K3 Editor Version 1.2 – Comparison of User waveform preview with output

Older Versions

Version 1.2 (DEC 2019)

  • Improved user wave editor.
    • Bug fixes such as duplicate harmonics cause all harmonic data to be ignored by the synth
      • Note – zero values signal the end of the harmonics (behaviour of the synth)
    • Added a preview of the user wave 🙂
    • Sliders now trigger update of the user wave.
Download Version - 1.2

Version 1.1 (FEB 2016)

Download Version 1.1

C-PLG150-AN

  • 12/19/2020
  • Version 1.2

DOWNLOAD

Download C-PLG150-AN

Download C-PLG150-AN

C-PLG150-AN


This panel is a copy or emulation of the original PLG150-AN software.
This panel offers VST integration with your DAW.
Many thanks to Inteyes for his FreeEG code, from which I borrowed liberally .
This panel can load ANS or AN2 files.
Please use the Yamaha AN200 panel for the AN200.
This panel has been created using the MU100R as host to the PLG150-AN and has not been tested with any other hosts.
Please report any issues and any  suggestions welcome.
Download Source Code as bpanelz file – and precompiled VST Standalone and AU files by clicking on the SOURCEFORGE button!

  • CHANGELOG
  • Version 0.1 beta — first release 02/06/2020
  • Version 1.1 — ANS files not loading in MacOS 12/17/2020
  • Version 1.2 — Support for AN2 files / reload state saves user patches

Known Issues
If there are no images visible, or previous version images are showing after installing a new version of this program:

  •  MacOS ※
    — delete folder Library/Preferences/C-PLG-150-AN/ and restart program.
  • WINDOWS ※
    — delete folder C:Users%USERNAME%AppDataRoamingC-PLG-150-AN and restart program.
    @RD /S /Q “C:Users%USERNAME%AppDataRoamingC-PLG-150-AN”

DAW Setup
To create a VST or AU file:

  • Load the Ctrlr.dll (Ctrlr VST/AU) into your DAW
  • Load this panel into Ctrlr VST/AU instance.
  • Then go to File -> Export -> Export Restricted Instance.
    This will build a VST dll or AU (.component) file.
  • You can now load this panel independently of Ctrlr.
  • Or download pre built files from Download C-PLG150-AN


Running as VST under Cubase

  1. In Cubase, Disable †Midi-in **Midi-out ports to the “host ⇒ PLG-150-AN”.
  2. Open “C-PLG-150-AN” VST in an instrument track IN=(All Midi Inputs)
  3. Create Midi track IN=(All Midi Inputs) OUT=(“host ⇒ PLG-150-AN” Midi-in) (I record midi notes & data to this track).
  4. In the VST Ctrlr panel connect to the †Midi-in and **Midi-out ~ connected to “host ⇒ PLG-150-AN” (you disabled them in Cubase ( See step #1)).
  5. I found the only Midi-thru setting that needs to be checked was
    MIDI→Midi Thru→”Plugin-host->Output Device”
    (The 5th option down in the fold out menu)
  6. Engage Monitor on Both tracks.

Running as VST under Reaper
This is the “host ⇒ PLG-150-AN’s” audio output)

  1. Insert – Track
  2. Record Arm
  3. Monitor Input (right-click record button)
  4. Track Input:Stereo Input

(Ctrlr VST settings)

  1. Insert – Virtual Instrument on New Track – Panel
  2. Routing – MIDI Hardware Output – “host ⇒ PLG-150-AN”
  3. Ctrlr MIDI – MIDI Thru – Deselect “Input Device -> Output Device”
  4. Ctrlr MIDI – MIDI Thru – Select “Plugin Host -> Output Device”
  5. Ctrlr MIDI – “Input from host to comparator”
  6. Ctrlr MIDI – “Output to Plugin Host”

And make sure in your Preferences, Audio – MIDI Devices, you have it set so that your MIDI Device which connects to the “host ⇒ PLG-150-AN” is enabled for input, output, and control messages (right-click).

Ctrlr