Error 1402 when installing QuickBooks Desktop

QuickBooks-Error-1402

QuickBooks makes overseeing business bounteously simple with its useful features. Be that as it may, some of the time, regardless of being creative software, it gets a few errors. Among the most regular errors that clients face is QuickBooks Error code 1402. Normally, this error is set off because of an incomplete or improper installation of the software. The error, when shows up, shows a message that peruses “couldn’t open key.” QuickBooks Desktop Error 1402 is an Installation error that comes when there is some issue during the installation process. An incomplete/ill-advised installation that prompts essential segments missing prompts QuickBooks Error 1402.

The client will experience error message 1402 that says ‘Couldn’t Open Key.’ A broken installation misses on downloading essential files which are basic for running the software, and an adulterated installation prompts software getting rowdy.

What is QuickBooks error code 1402?

Before you dive in profound and investigate different parts of QuickBooks error code 1402, it is essential to comprehend the nuts and bolts of the error. The error code 1402 is regularly seen when the client is chipping away at QuickBooks. It emerges when the client works the QuickBooks finance bookkeeping software in Windows or Apple Mac OS X working framework. If there should arise an occurrence of any defilement in the software, this error is likely to occur. In a circumstance when the software needs some segment to run however it isn’t accessible, because of damaged windows files, this error may show up. It can likewise be seen while introducing or opening the QuickBooks desktop software. This error code concocts an error message expressing as “Couldn’t open key”. There can be a greater part of factors causing this issue, which we will talk about later in this post.

Causes of QuickBooks Error 1402

Underneath given are a portion of the reasons that lead to QuickBooks Error 1402 on your screen.

  • A ruined QuickBooks Installation record.
  • A damaged CD while introducing from the CD.
  • Improper or incomplete Installation
  • Windows not updated to the most recent version.

QuickBooks Error Code 1402 – Steps for Prevention

Whenever you have fixed QuickBooks Error code 1402, you can likewise find a few ways to guarantee that this installation error doesn’t happen once more.

  • You should continue to make reinforcements of your information consistently
  • Let software installations take as much time as necessary and don’t interrupt the process
  • Oftentimes erase the junk files.
  • Continue to put in new updates available for QuickBooks desktop.

Fixation of Error Code 1402 when installing QuickBooks Desktop

QuickBooks Install Error 1402 is an installation error which can be fixed by performing the following troubleshooting steps:

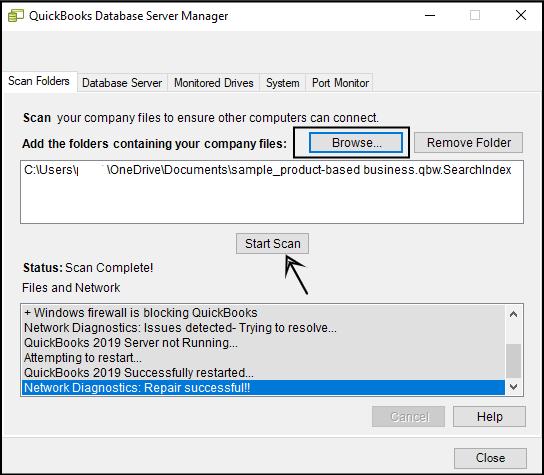
Solution 1: Put QuickBooks Install Diagnostic Tool To Use

QuickBooks Install Diagnostic Tool is a useful tool planned by Intuit to recognize and fix the issues identified with the QuickBooks installation. You can play out a without error QuickBooks installation by utilizing the tool as depicted beneath:

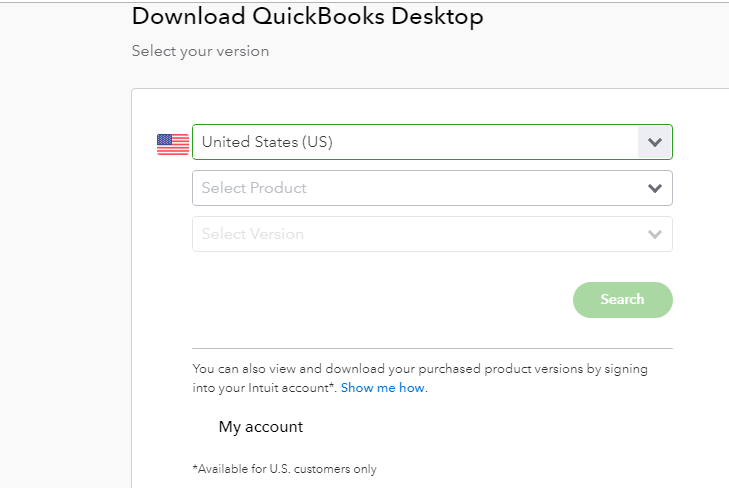
  • Visit Intuit’s site and download QuickBooks Install Diagnostic Tool (ensure that no program is running behind the scenes)
  • Save the QB Install Tool on your framework where you can undoubtedly discover it
  • Presently double tap the .exe installation document to open it
  • Consent to the permit arrangement and afterward click Proceed catch to run the output
  • Trust that the output will finish and afterward Restart your PC
  • Attempt to install the QB again to check if a similar error code is no more. Assuming the error proceeds, you need to follow the following arrangement.

Solution 2: Update MS Windows and install available updates

The installation error may be fixed by updating QuickBooks and installing the missing updates:

  • Click on the Start button on the keyboard on the Windows icon at the bottom left-hand corner of your screen
  • Search and find Check for Updates
  • Click on Check for Updates and find available updates.
  • Install all pending updates
  • Restart the computer for changes to make different.

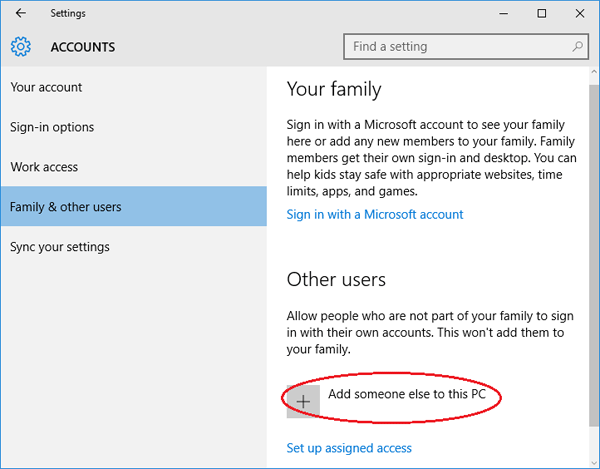
Solution 3: Reinstall QuickBooks Software

Many times, you may get QuickBooks installation error due to the other programs running in the system. You can resolve the issue by reinstalling QuickBooks Desktop.

  • Go to the Control Panel and click on it to Open
  • Now type Add or Remove Programs in the blank area
  • Next, search for the QuickBooks from the list of programs and select Uninstall
  • Once the uninstall process finish, restart your system and reinstall QuickBooks

Solution 4: Uninstalling and Reinstalling Adobe Flash Player

In case the error appeared while installing the adobe flash player, make sure to carry out the steps below:

  • First of all, download install diagnostic tool and then run it
  • And then, click on the start menu
  • Also, type in control panel in the search bar
  • Followed by clicking and opening control panel
  • The next step is to navigate to the uninstall a program option
  • And then look for the Adobe flash player ActiveX in the list of programs
  • Once done with that, select the uninstall option
  • Follow the onscreen instructions and let the uninstall process complete
  • The last step is to download the adobe flash player and then reinstall it

Need To Talk A QuickBooks Bigxperts Expert!

On the off chance that the QuickBooks error proceeds after all your troubleshooting efforts, and you need professional assistance in the error-resolution, to avail immediate assistance. Instantly, you will be connected to a dedicated QB Bigxperts expert and get relevant help for QuickBooks error 1402.

QuickBooks Error 15223

QuickBooks-Error-15223

QuickBooks error code 15223 is fundamentally an update error, that surfaces on the screen while downloading the payroll updates. Such an error is normally seen when there is any issue in the windows registry. It is additionally considered as a reoccurring regular QuickBooks error, that accompanies an error message expressing:

Error 15223: The QuickBooks Desktop update did not complete successfully.

Error 15223: Cannot Connect to QuickBooks Desktop Payroll

In the present article, we will discuss the causes and furthermore the fixes of the QuickBooks error 15223. Be that as it may, another solution for tackling the issue can be to connect with a group of experts and affirmed experts, who might help in settling the issue no sweat.

What is QuickBooks error 15223?

QuickBooks error code 15223 is essentially a repetitive error that the users may frequently go over. The client may confront such an error, when there is any sort of issue with the windows registry. It is additionally seen when the client attempts to download the payroll or update QuickBooks desktop. The client may go over the accompanying error message: QuickBooks desktop update didn’t complete effectively or Cannot connect to QuickBooks desktop payroll. The QuickBooks error code 15223 may hamper the smooth work process. This makes it significant for the client to dispose of the issue straightaway.

Causes for QuickBooks Error Code 15223

  • Damaged Windows Files
  • Improper Internet Explorer settings
  • Internet Explorer digital signature is not updated

Things to do before fixing this error

Create Company file Backup

  1. Open QuickBooks Desktop
  2. Go to File > Back Up Company > Create Local Backup
  3. Now follow onscreen instructions to create a backup

Solutions to the QuickBooks Update Error 15223

The QuickBooks update error 15223 can be settled via a few methods, which will be talked about later in this post. Allow us to investigate every one of the methods individually:

Method 1: Verifying Use TLS 1.1 and Use TLS 1.2 are unchecked

The very first method to fix the error can be to verify the USE TLS 1.1 and USE TLS 1.2 are unchecked. The steps to be followed are as follow:

  • The very first step is to open the internet explorer
  • And then, the user needs to select Tools > Internet Options
  • After that, click on the advanced tab
  • The user is then required to scroll to navigate the Use TLS 1.0, Use 1.1, and Use TLS 1.2, under settings
  • The next step is to verify Use TLS 1.1 and Use 1.2 are not checked and Use TLS 1.0 is checked.
  • QB TLS Internet Options – Screenshot
  • Now select Apply, then OK. Retry the update.
  • Finally, retry the update.

Method 2: Register .dll files

  • Press Windows+R keys together from the keyboard and a Run box will pop out
  • Copy(Ctrl+C) this code: regsvr32 /s %SystemRoot%\system32\softpub.dll
  • Paste(Ctrl+V) the code into the Run box and click OK
  • If you don’t see any message that means the file was registered successfully. In case you encountered an error make sure you copied the code correctly. If yes.
  • Then copy this code: regsvr32 /s %SystemRoot%\system32\WinTrust.dll
  • Press Windows+R keys together from the keyboard to open a Run box
  • Paste the code into the Run box and click OK
  • If you’re still facing a problem while registering the file that means your system has some issues.

Method 3: Steps for registering the first file

To fix this issue, the user can also register the first file. The below listed steps would surely help:

  • The user needs to press Windows start and then move to Run
  • And then, copy regsvr32/s% systemroot/system 32/softpub.dll
  • The next step is to paste this in the open filed and then hit OK
  • The user is then required to see a successful registry, then there we will be no messages
  • The last step is to verify and ensure that you have copied the register file exactly.

Steps to register the second file

  • The user needs to press Windows and then go running
  • After that, copy regsvr32/s% systemroot/system 32/wintrust.dll
  • Moving ahead, the user needs to paste in the open field and then click on OK
  • The next step is to clear IE SSL state
  • And then, open internet
  • Now, the user needs to select tools and the internet option and hit content
  • After that, press Clear SSL
  • The next step is to restart the system and after opening the QB desktop download the tax table update
  • The last step is to configure the firewall, antivirus or the third-party programs.

Method 4: Configuring firewall and internet security settings

  • In this step, the user needs to click on the Start menu and then navigate to the Windows firewall
  • Followed by selecting advanced from the right side
  • Also, right click on the inbound rules and then hit select new rule
  • The user will then be required to select the program and then hit next
  • Also, click on this program path and also tap on browse
  • Moving ahead, select any one path and hit next
  • Followed by ensure that you select allow the connection option and hit next
  • After that choose finish and name the rule
  • The next step is to repeat the steps for outbound rules
  • Lastly, the user needs to open QuickBooks in multi-user mode to check if the problem is resolved.

Method 5: Clearing the Internet SSL state

This is the last method that one can opt for, in case the above stated methods didn’t work for you. The steps involved in this process are as follows:

  • For this, the user needs to open the internet explorer
  • And then, choose the tools and internet options and also the content tab
  • After that, from the content tab, the user needs to select the clear SSL state
  • Followed by restarting the system and open QuickBooks
  • The last step is to download tax table update and you are good to go

Conclusion!

Settling the QuickBooks error code 15223 turns out to be simple, if the above expressed methods are executed appropriately. Be that as it may, assuming you need to facilitate your interaction significantly further, we suggest you counsel a team of experts and certified experts, who can deal with the circumstance for you.

Here you will get the most ideal QuickBooks Bigxperts experts team immediately. Along these lines, don’t stop for a second in calling us whenever, we will be eager to assist you.

Set up and Install a Multi-user Network for QuickBooks Desktop

Multi-user Network for QuickBooks Desktop

According to the QB users and their feedbacks, QuickBooks is respected to be one of the best accounting programming till date. It is exceptionally profitable and lets the user to manage all the accounting activities in the smoothest conceivable way. It accompanies endless highlights, one of which is multi-user mode, which not just strengthens the efficiency and additionally QuickBooks experience. It lets multiple users to access and manage the very record while too in a similar network.

How do I set up multi user in QuickBooks desktop? To empower multi–user mode, go to the File menu in QuickBooks and choose “Multi–User Mode”

Steps to Sync QuickBooks file between two computers:

  • Install and Download Data Transfer Utility provided by Intuit.
  • Paste your company file to the primary computer from a secondary computer.
  • Start QuickBooks on the primary computer.
  • In Data Transfer Utility.

What is multi-user network in QuickBooks desktop?

Before you become familiar with the process to set up multi user network in QuickBooks desktop, it is essential to understand, what it is really. Multi-user mode permits more than one individual to chip away at a solitary company file simultaneously. This component saves a great deal of time and makes things fast and simple. In the event that you are having a tremendous firm having an enormous number of workers, at that point multi-user mode can be truly helpful for you. However, it ought to be noticed that to set-up multi-user network in QuickBooks, the user needs to possess a different authorized duplicate of QuickBooks installed in the framework.

Quick facts to setup multi-user network

QuickBooks permits the users to have accesses to the information file everywhere on the network. However, every user should install the software independently. Various records are provided distinctive access like:

  • QuickBooks enterprise solution is allowed a stature of 30 users to access the file together
  • Though the number remaining parts a maximum of 5 users in QuickBooks Premier
  • And the number even drops down to maximum of 3 in QuickBooks Pro

Steps to Set up Multi-User Network in QuickBooks desktop

Below we have provided few of the technical steps to set up the multi-user network in QuickBooks desktop. You can also take help from QuickBooks customer support team to save your precious time and efforts.

Step 1: Download and install the QuickBooks Desktop

Download-QuickBooks-Desktop-from-Internet
  • First, Download the QuickBooks software and save it as a file.
  • Then, Install the Software in the system.
  • Choose the Multi-User host installation.

Step 2: Turn on Multi-user Hosting

Host-Multi-user-Access-in-QuickBooks-02
  • Open the QuickBooks software.
  • Update the company file to a new version if required.
  • Go to ‘file‘ > ‘Utilities‘ > ‘Host multi-user access‘.

Step 3: Turn on folder and Windows access permissions to share company files

  • Right-click the folder that carries the company file
  • Go to ‘Properties’ > ‘Select Security’ > ‘Edit’.
  • Choose ‘QBDataServiceUserXX’ and select ‘Full Control’, then ‘Allow’.
  • Click on ‘Apply’, and then click ‘OK’ button.

Set up Windows access permissions to share company files

  • Press ‘Windows+E’ keys to open the ‘File Explorer’
  • Find and right-click the folder containing your company files.
  • Move to ‘Properties’ > ‘Sharing‘ > ‘Share Add’.
  • Choose the corresponding ‘QBDataServiceUserXX’ for your version.
  • Set the permission level of both users to ‘Full Control’ and then, click ‘Share’.

Step 4: Configure the firewall and security settings for the desktop

Configuring-QuickBooks-firewall-and-security-exceptions03
  • Open ‘Start’ menu and search ‘Firewall’.
  • Choose ‘Windows Firewall’ and select ‘Advanced Settings’.
  • Right-click on ‘Inbound Rules’ and pick ‘New Rule’
  • Click on ‘Port’ and then, ‘Next’ button.
  • Check the ‘TCP’ option and type in specific ports needed for your QuickBooks year version.
  • Make sure ‘Allow the Connection’ is selected.
  • Checkmark all the profiles and go ‘next’.
  • Give the name to the rule and click ‘Finish’ when done.
  • Open QuickBooks Desktop again in multi-user mode or over your network.

Step 5: Scan your file and Set up the QuickBooks database server manager

Scan-Company-File-in-QuickBooks-Database-Server-Manager-04
  • Go to the ‘Start’ button > ‘Programs’ > ‘QuickBooks’.
  • Then, Click the ‘QuickBooks Database Server Manager’.
  • Pick the ‘Scan Folders’ tab.
  • Click the ‘Add Folder’ button.
  • Select the folder containing your company files and then click ‘OK’. Choose ‘Add Folder’ again to add additional folders.
  • Press the ‘Scan button’ to begin the scan.
  • Click close when the scan is completed.

Steps 6: Add the Windows Admin Rights to allow the Configuration of Multi-User access

Add-someone-else-to-this-computer5

For Windows 10:

  • Go to the ‘Start’ menu > ‘Settings’ > ‘Accounts’ > ‘Family & other users’.
  • Then, select ‘Add someone else to this computer’.
  • At the foot of the page, select “I don’t have this person’s sign-in information”, then Add a user without Microsoft account.
  • Give a ‘New name’ and ‘Password’ to the account.
  • Select ‘Finish’.
  • Then, provide administrator privileges to the new user.
  • Select the ‘newly created account’, then ‘Account Type’.
  • Choose the ‘Administrator tab’ from the drop-down.
  • Select ‘OK’ to save the changes.

For Windows 8 and 7:

  • Press ‘Ctrl+R’ keys and open the ‘Control Panel’.
  • Choose ‘User Accounts’ > ‘Manage another Account’ > ‘Create a new account’.
  • Type in the user name, then select ‘Administrator’ and click ‘Create’.

Step 7: Open a company file located on a remote computer

Switch-to-multi-user-mode-6
  • Go to the ‘QuickBooks File menu’ and select ‘Switch to Multi-user Mode’.
  • Select ‘Yes’ in the Multi-user set up hosting window.
  • Press ‘OK’ on the Multi-user setup information window.
  • Add the required users by going to ‘Company’ > ‘Set Up Users’ and ‘Passwords’ > ‘Set Up Users’ > ‘Add User’.

End!

Multi-user mode can be exceptionally valuable in making this smoother and effective. The steps given above will definitely assist you with completing the Setup of the Multi-User network in the QuickBooks desktop. We guarantee you that after these steps as per your necessities will make the process simpler. We prescribe you to converse with our professionals for some other question or doubt that you face during the process. You can talk with our QuickBooks chief support experts

QuickBooks 2018 Discontinuation Schedule

QuickBooks-2018-Discontinuation-Scheduled

It’s that time of year once more, Intuit has reported that they are discontinuing an older version of QuickBooks. In the event that you are utilizing QuickBooks 2018, you will not have the option to utilize certain services and features after May 31, 2021. We should perceive what the effect will be on your business. Your access to through QuickBooks Desktop 2018 software will be discontinued after May 31, 2021. This also means you’ll no longer receive

For subtleties past what I give here see this Intuit support document on Intuit’s disco (discontinuation) policy.

This means for the QuickBooks 2018 desktop products, after that date:

  • QuickBooks 2018 will keep on working after this date, for fundamental accounting functions.
  • Any assistance that depends on an Intuit worker (like desktop payroll, online banking, and so forth) will presently don’t be useful in this delivery.
  • Live specialized support for this item will presently don’t be accessible from Intuit.
  • Intuit won’t ensure that you can register products or recover keycodes (albeit, overall I track down that this hasn’t been an issue, for in any event a couple of years following discontinuation).
  • There will be no further updates to the program.

This applies to the following products:

  • QuickBooks Pro 2018
  • QuickBooks Premier 2018
  • QuickBooks Desktop Accountant 2018
  • QuickBooks Enterprise Solutions V18   

In addition, QuickBooks Desktop Point of Sale 12.0 payments services will be discontinued after February 2, 2021.

If loss of any of these services are a problem for your business, you can upgrade to a more current version to continue getting support.

Services Discontinued for QuickBooks Pro, Premier, and Enterprise 2018

After May 31, 2021, you will no longer be able to use the following services if you are using one of the 2018 products:

  • Basic, Standard, Enhanced or Assisted Payroll: After the cutoff, QuickBooks 2018 will at this point don’t automatically calculate correct payroll taxes, provide updated forms, or send your payroll data. For subtleties, see the QuickBooks Desktop Discontinuation FAQ for Payroll.
  • Worker’s Comp: You can at this point don’t deal with Worker’s Comp Payments through QuickBooks 2018.
  • QuickBooks Workforce (formerly ViewMyPaycheck): You and your representatives will presently don’t approach QuickBooks Workforce.
  • Installment Processing will presently don’t be accessible. You will not have the option to handle credit card and check transactions through the desktop item.
  • QuickBooks Merchant Service Deposit (compromise) will at this point don’t download credit card and check information into the desktop item.
  • Repeating Payments will at this point don’t be downloaded
  • eInvoice mailing will at this point don’t be empowered.
  • Live Technical Support will at this point don’t be accessible. In the event that you have a functioning QuickBooks Care Protection Plan, support will end when the arrangement is expected for recharging (month to month, multi day, or yearly).
  • Bookkeeper’s Copy File Transfer (ACFT) service will at this point don’t work with QuickBooks 2018.
  • Multicurrency Exchange Rates will at this point don’t be accessible for empowering or updating.
  • Contributed Reports will at this point don’t be open.
  • Online Backup will at this point don’t be accessible when your support plan terminates.
  • Online Banking, for example, downloading transactions or sending/getting online payments, will at this point don’t work. In the event that you attempt, it will show you one of a few distinctive error messages (contingent upon your download technique) on the off chance that you endeavor to transfer or download transactions, send online payments, or send online transfers. One model would be “QuickBooks can’t confirm the Financial Institution Information for this Download.”
  • TSheets will at this point don’t be accessible inside QuickBooks desktop straightforwardly. To sync your TSheets Data with QuickBooks, overhaul your QuickBooks or utilize a web connector.

Those are the services that Intuit specifically mentions, however I accept that there are other services not recorded that may at this point don’t work after the discontinuation date. Here’s rundown of a portion of the other services that I expect won’t be provided for QuickBooks 2018 after the disco date, in light of what we’ve seen in prior years:

  • 1099: You probably won’t have the option to dispatch the 1099 Wizard. You actually ought to have the option to utilize an extra 1099 e-documenting service, however.
  • QuickBooks email (the interior QuickBooks mail service for emailing solicitations), which is by and large connected with one of the services recorded before, should presently don’t be accessible.

Outsider extra products ought not be straightforwardly influenced by this – however you should check with your vendor to perceive what their policy is.

What Should You Do?

If you are using QuickBooks, the standard answer is, “Now is the time to upgrade.”

There are four areas of concern when upgrading:

What features have changed? Intuit is adding less new features each year, and moving from 2018 to 2021 won’t be as awful a change as has happened in some prior years. These articles can give you some thought of what’s in store:

  • QuickBooks 2019 new features
  • QuickBooks 2020 new features
  • QuickBooks 2021 new features

Have framework prerequisites changed? This may be an issue for certain individuals, so you should check before upgrading

QuickBooks 2021 isn’t supported on the entirety of the working frameworks that QuickBooks 2018 worked on, like Windows 7 and Windows Server 2011. In addition, on the off chance that you are utilizing QuickBooks Enterprise on Linux (database server only installation) there might be a few changes in what is required, you should check with Intuit support for subtleties.

Microsoft Office 2010 is not, at this point supported.

QuickBooks Point of Sale V10.0 isn’t supported.

TurboTax 2016 and 2015 (Personal and Business) are not supported.

Lacerte 2016 and 2015 are not supported.

Favorable to Series charge years 2016 and 2015 are not supported.

Enliven 2015 isn’t supported

In the event that you are as yet utilizing Adobe Acrobat Reader versions older than 9.0 you should redesign that utility (it’s free, so no reason not to). I don’t see a ton of issues in such manner, this year. See this framework necessities page for subtleties.

Converting your QuickBooks company file. Upgrading of your QuickBooks data ought to be moderately easy going from QB 2018 to 2021, despite the fact that there can sometimes be issues. Before you introduce the overhaul, ensure you have a decent backup of your company file. You ought to do a check of the database before conversion, to check whether there are any glitches, before converting. On the off chance that there are issues, they can meddle with the conversion. We suggest that you work with a proficient consultant in performing your update so you don’t lose any time in working out the subtleties. Nonetheless, basically all you should do is to introduce the new program and open your old file with that new program. QuickBooks 2021 will handle the conversion automatically.

Official QuickBooks 2018 discontinuation messaging from Intuit

After May 31, 2021, access to add-on services will be discontinued for QuickBooks Desktop for Windows 2018. This incorporates all versions of QuickBooks Desktop Pro, Premier, and Enterprise Solutions v18 .

In the event that you don’t utilize any of the extra services in QuickBooks Desktop 2018, your product will continue to work for you. You won’t buy in to live technical support or any of the other Intuit services that can be coordinated with QuickBooks Desktop.

In addition to QuickBooks Desktop for Windows 2018, there are a couple of other Intuit products that are influenced by the discontinuation of extra services.

Your access to QuickBooks Desktop Payroll Services, Payment Processing, Live Support, Online Backup, Online Banking, Technical Support and other services through QuickBooks Desktop 2018 software will be discontinued after May 31, 2021. This likewise implies you’ll presently don’t get critical security updates beginning June 1, 2021.

Resolve PDF and Print problems with QuickBooks Desktop

Resolve-PDF-and-Print-problems-with-QuickBooks-Desktop

Intuit’s QuickBooks is perhaps the most utilized accounting software in the world. It has especially profited the little and medium measured businesses generally with its amazing features. Indeed, numerous cases that it has changed the manner in which accounting is finished. Directly from overseeing accounts to creating reports to solicitations this application does everything to ease and smooth out business activities.

QuickBooks has numerous amazing features and one such extremely powerful one is QuickBooks Print and PDF. Notwithstanding, clients frequently face issues while printing solicitations, records, pdf’s and so on In such situation’s clients are proposed to utilize the QuickBooks PDF and Print Repair Tool. This tool is intended to fix issues identified with Microsoft segments that surface while printing any reports. This tool settle issues identified with printing and PDF.

What is PDF repair tool in QuickBooks?

To print documents, QuickBooks require various parts like XPS Document Writer, MSXML, and Print Spooler service, and any deficiency or specialized tangle identified with these segments trigger errors. QuickBooks PDF repair tool is planned in a manner to fix the issues in Microsoft segments that happen at the hour of printing. This tool goes about as both PDF repair tool and printer repair tool. The cycle to download and install PDF repair tool is talked about later in this post.

About PDF repair tool:

  • Language: English
  • Version: Latest Version
  • Size: 23 MB
  • License: Both Free & Paid
  • Downloads: 19 M
  • Developer: Intuit

System Requirement for QuickBooks PDF repair tool

  • Internet: Required to Download
  • Memory: 1 GB RAM, 512 MB free hard disk space
  • Screen Resolution: 1024 x 768 or higher screen resolution recommended
  • Processor: 266 MHz or even faster computer processor
  • OS: Windows (All Versions)

Causes behind QuickBooks PDF and Printing Errors

There can be a lot of elements that may cause QuickBooks PDF and Print issues, a couple of which are referenced underneath:

  • PDF record part is missing
  • Or in case the PDF converter is disconnected
  • Another factor causing the issue can be, if the framework is unable to communicate with the printer
  • Similar issue can be faced, when an arranged network is unavailable
  • The user can also encounter PDF and print issues, if the printer programming isn’t introduced adequately
  • If a non working print driver host is present, the issue is probable to occur
  • Another reason can be outdated QuickBooks software

Steps to download, install, and run QuickBooks PDF repair tool?

There can be two methods to download QuickBooks PDF repair tool, either downloading straightforwardly from the Intuit’s website, or utilizing it through QuickBooks Tool Hub. We will discuss every one of the methods individually. Allow us to see:

Method 1: Run the QuickBooks Print & Print Repair Tool from the QuickBooks Tool Hub

Step 1: Download and install the QuickBooks Tool Hub
  • The first step is to download the QuickBooks Tools Hub. Now, save the file somewhere that you can easily find it, just like the Windows Desktop or downloads folder
  • Moving ahead, agree to the terms of service
  • Once the download is complete, open the file
  • To install the same, follow the onscreen instructions
Step 2: Use QuickBooks PDF & Print Repair tool , from the Tool Hub
  • To begin with, the user is required to tap on to the ‘Program Problems‘ option that will be shown in the ‘QuickBooks Tools Hub’.
  • Moving ahead, choose the ‘QuickBooks PDF & Print Repair Tool‘, which might take a minute or two to run.
  • Once done with the steps above, the user should make an attempt to send an email, print or save the file as a PDF.

Method 2: Another method is to reset your temp folder permissions

This solution majorly consists of two steps and a few sub-steps. The steps include:

Step 1: The first step is to reset the temp folder permissions

In case the error persists, the user is required to reboot the computer and once again try for the same. However, if the user faces a failure again, then he/she can try resetting the temp folder permissions.

  • To start with, the user is required to tap on the ‘Windows key + R‘ keys simultaneously, in order to open the ‘RUN‘ command.
  • The next step is to write and enter ‘%TEMP%‘, followed by hitting ‘Enter‘ key.
    • Run temp command – Screenshot
    • Now, right-click the empty area of the temp folder, and then select the option of ‘Properties‘.
    • Click on the ‘Security‘ tab.
    • Make sure that all the usernames and groups displayed on the Security tab have the Full Control.
    • When the permissions have been set to ‘Full Control‘, then try to ‘Save as PDF‘.
  • Step 2: Give your confirmation that you can print to your XPSIn this step, the user is required to confirm if they can print to their ‘XPS Document Writer‘. The steps to do the same are as follows:
    • First of all, the user is required to ‘Open the Notepad‘.
    • Moving forward, write anything for testing purpose.
    • Now, visit the ‘file‘ and then click on the ‘Print‘ option.
    • The user needs to then choose the ‘XPS Document Writer‘ option, and choose the ‘Print‘.
    • Give your confirmation that you can print to your XPS – Screenshot
    • Now, pick the option of Desktop, from the save as dialog box.
    • Lastly, navigate to the desktop and find out whether you are able to view the XPS document that you have printed from your notepad or not.

Method 3: Find out whether the reconcile window is off of the screen or not

In case the QuickBooks desktop software appears to lockup after picking reconcile from the Banking menu, however, if the PDF functions are operational, then the reconcile window might display off of the screen.

  • In such case, select the ‘Window menu‘ and check if the reconcile window is listed or not.
  • Pick the option, Close All and start with the reconciliation process once again.

Method 4: Test, reinstall, and alter permissions for XPS Document Writer

There are specific points that the client is required to consider prior to starting with this method. You may be thinking what those points are, to make it simple for you, we have listed those points beneath:

  • Intuit doesn’t uphold the Microsoft applications and is additionally not liable for running these tools.
  • Assuming the client is awkward in playing out these errands, it is proposed that they should search for an IT expert to play out a similar undertaking for them, to keep away from any wreck.
Step 1: The first step is to test the XPS document writer, by simply printing outside QuickBooks
  • To begin with, the user is required to select the ‘Print‘ option from the ‘file menu‘.
  • select the Print option from the file menu – Screenshot
  • After that, choose the ‘Microsoft XPS Document Writer‘ from the list of printers in the print window.
  • choose the Microsoft XPS Document Writer from the list of printer – Screenshot
  • Now, save the ‘.xps file‘.
  • save the .xps file – Screenshot
  • Lastly, visit the desktop and find out the .xps file:
  • There can be certain situations encountered, one of which is that if the file is not there and the user didn’t encounter an error while saving the same. A security setting might be stopping the user from printing to the XPS Document Writer.
  • In case the .xps file is present, the user is required to open it. In case he/she encounters any sort of error in opening the file, or also if the file doesn’t show up in a proper manner, then the user is required to reinstall the XPS Document Writer.
  • Lastly, if QuickBooks desktop bumps into a problem while the user tries to print, then also there is a need to reinstall the same.
  • Now comes the step 2, which has two parts, namely A and B.
  • Read Also: How to troubleshoot QuickBooks error 2000?
Step 2: Reinstalling the Microsoft XPS Document Writer

Part A: In the first part, the user is required to ‘Verify‘ whether the XPS Services are enabled or not.

Part B: In the second part, the user should reinstall the XPS Document Writer.

Let us explore, each of the steps one by one.

Part A: By following simple steps, the user can Verify whether the XPS Services Are Enabled or not

  • Tap on the ‘Windows key‘ along with pressing ‘E key‘, in order to open the window explorer.
  • In the upper left, pick the ‘Computer tab‘.
  • Choose the uninstall option or change a program under the System group.
  • Now, the user has to opt for the ‘Turn Windows Features‘ on or off over on the left.
  • Turn Windows features On or Off – Screenshot
  • Lastly, scroll down and make sure that both the XPS Services and XPS Viewer are enabled.
  • Part B: Reinstalling the XPS Document Writer in Windows 8 and Windows 7/Windows Vista
For Windows 7/Windows Vista:

To start with, the user is required to select the ‘Devices and Printer’ options from the ‘Windows Start‘ menu.

  • Now, choose the ‘Microsoft XPS Document Writer icon‘, followed by selecting the ‘Remove device‘.
  • To continue and confirm, choose ‘Yes‘.
  • Choose ‘Add a printer‘ and select ‘Add a local printer‘ option respectively from the toolbar.
  • After that, choose the option ‘Use an existing port‘.
  • Also, choose ‘XPSPort: (Local Port)‘, and then hit ‘Next‘.
  • Now, the user is required to select ‘Microsoftt‘ and then ‘Microsoft XPS Document Writer v4‘, from the manufacturer list.
  • After that tap on to ‘Next‘.
  • The final step is to pick the ‘Replace the current driver‘ option and tap onto the ‘Next‘ option.
For Windows 8:

To begin with, the user is required to hover the mouse in the lower or upper right-hand corner, in order to display the ‘Start Screen‘.

  • Now the user has to choose the ‘settings > Control Panel > Devices and Printers‘.
  • Moving ahead, the ‘Microsoft XPS Document Writer‘ icon is to be selected, followed by choosing the ‘Remove device‘.
  • The user is now required to select the option ‘YES‘ to give the confirmation.
  • From the toolbar, select the option of ‘Add a printer‘, followed by picking the ‘Add a local printer or network print‘ with manual settings option.
  • The next step is to select the ‘PORTPROMPT‘ i.e. local port, in the use an existing port option.
  • Tap on to the ‘Next‘ option to move ahead.
  • The user is required to hit the ‘Microsoft‘ option, and then ‘Microsoft XPS Document Writer v4‘ from the manufacturer list.
  • Again tap on to the ‘Next‘ option.
  • Now, select the ‘Replace the current driver‘ option and then tap on to ‘Next‘.
  • Take out the v4 in the Printer Name field, thus, the name is ‘Microsoft XPS Document Writer‘.
  • The final step is to hit the ‘finish‘ tab and you are good to go.
Step 3: In this step, the user is required to adjust Windows user permissions for the XPS Document Writer

If by any chance, the Windows user is not having the permission to print to the XPS document writer, then in that case the QuickBooks software will not be able to create the .xps file. Also, the user is required to be logged in with Admin Rights to change these permissions.

  • The very first step is to open the ‘Printers Control Panel in Windows‘
  • And then, Right-click the ‘Microsoft XPS Document Writer‘, followed by selecting the ‘Printer properties(Windows 7 & 8) or Properties (Windows Vista)‘
  • Now, tap on the ‘Security‘ option.
  • Choose the ‘Everyone user group‘.

This step is optional. In case the Everyone group is not seen in the list, the user can take necessary actions, which include:

  1. a) Hitting the ‘Add button’.
  2. b) Entering the ‘term Everyone’ in the field and lastly
  3. c) Tap on to ‘Check Names’ and hit ‘OK‘.
  • Moving ahead, the user is required to select ‘Print‘ and hit ‘OK‘ tab, in the Allow column.
  • Now, the user is required to navigate to ‘C:\Windows\System32\spool in Windows Explorer.‘
  • In this step, the user is required to choose the ‘Printers‘ option and select ‘Properties‘.
  • After that hit the ‘Security‘ tab.
  • Now click on the ‘Edit‘ option.
  • Moving ahead, tap on the ‘Add‘ option.
  • Type ‘Local Service‘ and select ‘Enter‘.
  • Make sure Local Service has ‘Full Control’, then select ‘OK‘.
  • Open QuickBooks and try to ‘create a .pdf file‘.
Step 4: In this step, the user is required to edit the security software settings

At times the creation of .xps files can also be blocked by the settings of the security software such as, Norton Antivirus or McAfee firewall. Thus, the user is required to check those setting on their security software and ensure that the .xps files aren’t blocked.

Final Word:

Ideally, the previously mentioned data may help you in downloading, installing, and utilizing QuickBooks PDF repair tool. In any case, in the event of any question, our QuickBooks Bigxperts service group will be there to assist you in a solitary call.  We are a center point of well informed accounting experts, who don’t leave any stone un-turned in offering the most ideal help services. If you Troubleshoot PDF and Print problems with QuickBooks Desktop worry not. A Tool called Print and PDF Repair tool can easily fix the error.

QuickBooks Crashes After Installing Windows Update

QuickBooks Crashes After Installing Windows Update

Clients of QuickBooks Desktop have indeed begun detailing that it is crashing after the most recent Windows X (Windows Ten) Updates were introduced on their Computer. It appears to be that the soonest announced occurrence of this may have been around August 26th, yet it has filled in increasing consistency and seriousness since September first.

QuickBooks is viewed as one of the best accounting software, however the lone disadvantage of this software is that it is inclined to specific errors. One such mistake is that the QuickBooks will not blunder open after Windows update. There can be a circumstance, when QuickBooks desktop doesn’t begin two or three minutes in a totally expected state. This kind of mistake typically happens because of certain technical glitches. It by and large happens while doing a specific errand on the software. It is constantly prescribed to the client while refreshing the software to the most recent version of QuickBooks, as it has the high level highlights and devices. In the present post, we will discuss the QuickBooks Crashes After Installing Windows Update error, particularly the causes and fixes of the issue.

Why QuickBooks Crashes After Installing Windows Update?

Now and again, when the client attempts to open the software, an error shows up on the screen stating ” QuickBooks Crashes After Installing Windows Update ” or once in a while no error at all shows up and the framework freezes consequently. This error is additionally seen when the client attempts to open the company file. Likewise, different other company file issues can be seen alongside it in particular: QuickBooks error code 1603, error code 1935, or error code 1402. There can be different potential causes of this error, which will be examined later in the post, alongside the fixation methods. Accordingly, keep perusing for further information.

Causes behind to this error

As we said previously, there can several components prompting such an error, to be specific:

  • Long company file name for example exceeding as far as possible
  • Or on the other hand adulterated hard drive can be another issue
  • The client could wind up in such an error, in the event that the installation of the software isn’t appropriate
  • Or on the other hand if the QBWUSER.INI file is absent or harmed, this error may show up
  • Another factor prompting QuickBooks will not open after update error is the obsolete operating system.

Symptoms for QuickBooks won’t open or doesn’t begin error

Distinguishing the QuickBooks doesn’t begin error turns out to be simple with the assistance of the beneath referenced signs and symptoms:

  • QuickBooks desktop freezes while running similar applications
  • Or then again the client is operating an old version of QuickBooks
  • On the off chance that the system freezes occasionally
  • Another indication can be if the QuickBooks company file neglects to open
  • Or then again the PC reacts gradually to the keyboard and mouse inputs

How to Fix QuickBooks Doesn’t Open or Stops Working Problem on Windows 10 (Dell/HP/Lenovo/Asus/Acer)?

Here are some of the ways or methods to fix this error:-

Solution 1: Restart the Computer

  • In most of the instance, a simple system restart can fix the problem
  • Click on the ‘Restart’ tab from the ‘Windows Start’ option
  • You will get rid of the current state of the QuickBooks software
  • Launch the QuickBooks application after the restart

Solution 2: Add Exceptions to Antivirus, Firewall/Disable Windows Firewall, & Multiple Antivirus

In the event that, you are experiencing QB stacking or launching problem then it conceivably is the antivirus or security firewall which doesn’t permit the QuickBooks software to stack. This happens in light of the fact that this present software’s perceives the QB files as conceivably dangerous and destructive. Henceforth, the system blocks it from running.

  • You can add exceptions to the QuickBooks application.
  • You can call your individual Antivirus Company on the off chance that you need support in adding an exception for the QuickBooks software.

Most of the event Antivirus causes the QuickBooks software to crash/freeze so on the off chance that you have different security operating on the computer, immobilize all the antivirus except one or take a stab at changing to another antivirus in the event that one explicit antivirus application is causing the problem. On the off chance that this doesn’t help with immobilizing the Antivirus software, you should endeavor to open the QuickBooks

Solution 3: Rename/Delete QBWUSER.INI file

Another strategy is to rename or erase the QBWUSER.INI file, as it helps in eradicating each information saved in the rundown of recently opened files. The means included are:

  • The initial step is to press Windows + E keys
  • After that, under the organize tab on the top left press, folder and search options
  • The next step is to press view tab
  • Also, under the advanced settings >> hidden files and folders, and then choose the show hidden files and folders and then hit OK button
  • After that, navigate to my computer >> C: drive >> Documents >> [your username] >> Local settings >> Application data >> Intuit >> QuickBooks
  • The next step is to right click the QBWUSER.INI file and then hit a click on delete and rename option

Solution 4: End the QBW32.exe Process

At now and again, QuickBooks programs or cycle that works in the climate isn’t running. Thus, restarting the QuickBooks application indeed can resolve the issues.

  • In the Windows search box, type in the ‘task manager’ to open Task Manager.
  • Once the task manager is open choose the “Details” tab.
  • Find & choose the QBW32.EXE and later, perform a right click on it to “End” the task.

Solution 5: Run QuickBooks Install Diagnostic Tool

  • Download & install the QuickBooks Install Diagnostic Tool from the Intuit’s official website.
  • Save the “exe” file on the computer when prompted.
  • Shutdown open applications/programs. Later, run the QBInstall Tool. It may also take some time to finish the process.
  • Reboot the computer once it diagnoses thoroughly.

Solution 6: Verify the Company File & QuickBooks

Now and again, it very well may be conceivable that there could be a damaged company file/envelope. Consequently, we need to guarantee that QuickBooks software is working admirably. Conceivably, QuickBooks is attempting to access/open the previous QB Company files/organizers, so it’s expected to limit in a circumstance where QuickBooks or its related company file is damaged.

  • Perform a right-click on the “QuickBooks” tab on the computer.
  • Later, press & hold the “Ctrl” key and choose the “Open” icon.

Solution 7: Repair the QuickBooks Installation

Intuit Inc. proposes you make the QuickBooks Desktop installation CD before the repair cycle. On the off chance that the QB software bought via telephone or any online medium, guarantee to download the installer from the QuickBooks website.

  • Reboot the computer.
  • Create the backup the QuickBooks company file.
  • In the Windows search box, type in the “Control Panel” to open the “Control Panel”
  • From the “Control Panel” windows, select the “Programs and Features” icon or “Uninstall a Program”
  • In the listed programs, select the QuickBooks software.
  • Later, choose the “Uninstall/Change”
  • Select the “Continue” tab & later, hit onto the “Next”
  • Select the “Repair” tab & then hit the “Next” icon, now wait for the “Repair” to complete.
  • Choose the “Finish” icon & “Restart” the computer if prompted.
  • Confirm that you downloaded the latest QuickBooks release by following the steps from here & also the latest payroll tax table.

Solution 8: Create a New Admin Account

  • To make local account access/open the ‘Windows 10 Settings’ by clicking on the “Windows + I” keys icon simultaneously on the keyboard,
  • After that go to ‘Accounts’ section,
  • Now go to the Family or other people, and click on the ‘Add someone else to this PC’.
  • In case, this process requires an email address, then do not enter any email click on I don’t have this person’s sign in information.
  • After that select the ‘Add a user without a Microsoft account’
  • And create a new username & password and click on the “Next” icon.
  • Confirm that you make this local account an administrator.
  • Once the account created on the same account settings page..! Click on the new local account which you have created,
  • Now click on the “Change account type” icon.
  • Then transform type from “Standard User” to “Administrator”

We trust that this technical answer would be helpful for you to comprehend this problem better. In any case, it very well may be conceivable that there are some muddled subjects or bother. In such condition, you can straightforwardly contact our Certified QuickBooks support Bigxperts team.

QuickBooks 2018 installation stops during Window Error Code 1904

QuickBooks 2018 Installation Errors

QuickBooks is a creative software! However, it isn’t something uncommon for it to get issues. One of the numerous inconveniences announced by clients is QuickBooks 2018 Installation Errors. This mistake may inconvenience the two Windows and Mac clients. This blunder doesn’t permit the QuickBooks to begin, or frustrate it from opening and working completely even in the wake of clicking QuickBooks or company file symbol. There may be different reasons to prevent QuickBooks accounting software from opening.

In this article, we will talk about on a few fundamental strides to determine different kind of QuickBooks desktop installation errors for Windows and Mac. Nonetheless, on the off chance that you are searching for moment help structure capable accounting experts you can contact our QuickBooks support group. We can deal with such a worries related with these errors.

What May be the Reasons for QuickBooks installation errors?

There may be one or more of the following reasons to trigger the QuickBooks error:

  • This error may happen on the off chance that you open QuickBooks on different occasions. On the off chance that you double tap on the QuickBooks Desktop icon over and over, it would forestall your QB company file from opening successfully
  • It could be caused because of an incorrect way that you embrace to open a specific file type
  • The issue might be with reports and different windows inside the file
  • The installation error may likewise happen on the off chance that you utilize any inappropriate version of QuickBooks to open the company file, organizer, packed or scrambled file
  • Inappropriate file name and extension, or data corruption may likewise trigger this issue

Repair the QuickBooks Installation

If you’re experiencing QuickBooks connectivity issues, issues with QuickBooks ability to talk to other applications, or QB won’t run (or similar issues), then Repairing the QB installation will often help

QuickBooks 2018 version is the latest edition to the QuickBooks family.It has brought in many new features and tools that have definitely eased the life of bookkeepers and accountants even more. However, the Solved: QuickBooks 2018 installation stops during Window errors related to the installation process encountered with previous versions of the software has followed to QuickBooks 2018

In case, there are multiple QB errors are appear on the display and they exclusively state the ICWrapper.dll, qbprefs.dll, RcnFndRequestHandler.dll & qbupdate.exe (among others), then the trouble is possibly caused by the Microsoft Visual C++ damaged component.

Solved: QuickBooks 2018 installation stops during Window Error Code 1904: [file way/name/extension]

Under this error, the cause is generally related to setting restrictions of the document or a damaged record. In case the error message state different issue related to following records:

Causes of QuickBooks Error code 1904

  • QB Error 1904 might come due to the low maintenance of the computer.
  • Missing or damaged components.
  • No or old updates on a computer and QuickBooks Desktop.
  • Problems with installation source.
  • Hard drive read-write glitches or permissions.

QuickBooks Installation Errors Code

QuickBooks Install Error 1722QuickBooks Installation Error Third Party Components
QuickBooks Install Error 1920QuickBooks Installation Error Flash
QuickBooks Install Error 1904QuickBooks Installation Font Error
QuickBooks Install Error 1334QuickBooks Installation Error Msi
QuickBooks Install Error 1603QuickBooks Install Memory Error
QuickBooks Install Error 1311QuickBooks Install Module Error
QuickBooks Install Error 1935QuickBooks Installation Error Not Enough Memory
QuickBooks Install Error 1911QuickBooks Install Diagnostic Tool Error
QuickBooks Install Error 1325QuickBooks Install Error 1601
QuickBooks Install Error 1327QuickBooks Install Error 1712
QuickBooks Install Error 1406QuickBooks Install Error 1723

How to QuickBooks Fix Error: 1904 when you install QuickBooks Desktop?

QuickBooks log in error 1904, Execute the following fixation steps in the order shown to resolve the problem.

Solution 1: Run the QuickBooks Install Diagnostic tool

  • Select the “Ignore” tab on the error message and let the QB installation complete. Try not to open QuickBooks software.
  • Restart the PC.
  • On the off chance that the QuickBooks installation didn’t finish, download and run the QuickBooks Desktop Install Diagnostic Tool.
  • Reboot the framework.
  • On the off chance that running the tool unfit to fix the error, initiate the inherent Administrator and install QuickBooks software under the implicit administrator account.

Solution 2: Activate the built-in or hidden administrator

Step 1: Activate the Built-in Administrator
  • Tap the “Windows” button on the keyboard.
  • Type in the “CMD”. Right-click on the “CMD/ Command Prompt/ cmd.exe” & choose the “Run as Administrator”.
  • In the command prompt window, enter the “net user administrator /active:yes” and hit the “Enter” tab.
Step 2: Switch to the built-in Administrator Account
  • Press the “Ctrl+Alt+Delete” on the keyboard simultaneously, then choose the “Switch User Windows 8 users”: hit the “Windows” button & choose the user icon on the upper right of the display.
  • Hit the “Ctrl+Alt+Delete” at a time & choose the “default Administrator account” icon.

Read Also: Quickbooks error 3371 status code 11118

Step 3: Hide the built-in Administrator Account
  • Click on the “Windows” button on the keyboard.
  • Type in the “CMD” in the search box. Press right-click on the “CMD/ Command Prompt/ cmd.exe” & choose the “Run ad Administrator” tab.
  • In the command prompt screen, type in the “net user administrator /active:no” and hit the “Enter” key.

Solution 3: Manually fix Windows components

  • We recommend you to follow these troubleshooting steps under the guidance of an IT professional, or a confident Windows user, or working with the experts from Microsoft support.
  • Firstly, Repair or reinstall Microsoft .NET Framework
  • Then Repair Microsoft MSXML

Solution 5 – Uninstall and Reinstall Adobe Flash Player

If in case, QuickBooks Error 1904 appears on the screen during the installation of Adobe Flash Player, then follow these steps –

  • Download QB Install Diagnostic Tool and run it.
  • Click on the Start menu.
  • Type the words – Control Panel – in the search field.
  • Click on Control Panel to open it.
  • Now, go to Uninstall a program.
  • In the list of programs, look for Adobe Flash Player ActiveX.
  • You have to choose Uninstall.
  • Follow the instructions and let the uninstallation get completed.
  • Download Adobe Flash Player and reinstall it.

He continually helping customers to fix out issue and problems. The two arrangements accommodated the client having installation issues with QuickBooks isn’t the solid ones and will need suitable help from the QuickBooks Professionals of Intuit. Fortunately Intuit has arrived at the degree of 100% resolution status for practically all installation issues and makes certain to give best resolution possible. On the off chance that the client actually face issues with these little updates for QuickBooks they can connect with either Intuit set-up QuickBooks Bigxperts team

Quickbooks payroll error 12007 Bigxperts

QuickBooks Update Error 12007 happens when system files are misconfigured because of which causes registry errors in your working system. This error by and large influences your system because of the QuickBooks update break. Another explanation might be that your QuickBooks account is obstructed from getting to the server. While downloading finance or QB updates, a client of QuickBooks accounting software may experience a 12007 error. QuickBooks Update error 12007 might be experienced by the client when QuickBooks can’t associate with the Internet. This might be brought about by program, antivirus, or firewall issues.

What Is QuickBooks Error Code 12007?

QuickBooks Error Code 12007 happens by QuickBooks Desktop not having the option to build up a connection with the Internet on your computer. QuickBooks Error Code 12007 essentially happens because of general Internet connection disappointment. There can be other potential causes, for example, mistakenly arranged system files. At the point when these QuickBooks update issues like “QuickBooks payroll update error 12007” crop up, you will see an error message on your screen – “QuickBooks has encountered an issue and should be closed down. We apologize for the burden.”

Conceivable Cause For QuickBooks Error 12007:

  • QB error code can happen because of a few potential reasons as recorded beneath
  • QuickBooks neglected to associate with the Internet causing error in downloading the updates
  • The work area can’t set up a connection for QuickBooks
  • Firewall or Internet security settings may be hindering the program to get to the server
  • The erroneous setting of your SSL can likewise prompt QuickBooks Error Code 12007
  • The default browser probably won’t be Internet Explorer, i.e., unsupported Internet Browser

How to Fix QuickBooks Update Error 12007?

Investigating QuickBooks error code 12007 relies upon the situation where the error happened. Look at the beneath offered steps to fix this error.

Condition 1: If the error has happened while updating QuickBooks

Check the internet connection in QuickBooks and ensure that the Internet connection is effectively set. Here you need to guarantee that the internet connection is set for QuickBooks utilized in the legitimate and required way.

Additionally, you can go through a knowledge base of local area discussions of Intuit to fix the error that has been happened.

For extra data fixing the error that happened while updating QuickBooks, you can go through a knowledge base of local area gatherings of Inuit.

Condition 2: Check Your Internet Explorer Configuration

  • Beginning with Internet Explorer settings may save you from performing further steps. You can without much of a stretch change the settings to recheck if the QB payroll update error 12007 is fixed.
  • Snap Gear symbol on the top right corner of Internet Explorer and select Internet choices starting from the drop menu.
  • Go to the Connections tab and tap on LAN Settings.
  • Check-check the case close to Automatically Detect Settings and guarantee that servers are clear while refreshing QuickBooks.
  • Apply the progressions and move to the Advanced tab.
  • Presently find SSL 2.0 and SSL 3.0 and check-check the particular boxes. Uncheck the case against Check for distributer’s testament alternative.
  • On a similar tab, look down to confirm that TLS 1.2 alternative isn’t checked. Additionally, ensure that the crate close to TLS 1.1 is checked.
  • Subsequent to playing out this progression, have a go at refreshing QB to guarantee that QB payroll update error 12007 is fixed.

Condition 3: The disappointment Occurred at the time of QuickBooks updating

  • Check out the “Internet setting” in QuickBooks from the assistance envelope
  • After that “Open your connection arrangement” of the Internet from the menu
  • Confirm that your organization is set to deal with your computers internet connection settings
  • In the event that the issue actually continues, attempt the accompanying investigating steps.

Condition 4: Opening Windows in safe mode with networking

On the off chance that the client is encountering the issue once more, they should attempt to open windows in safe mode and afterward check if the error has been addressed or not. Opening windows in safe mode, alongside networking, will take care of the issue by and large.

Condition 5: Resetting Internet web browser

  • At absolute first, you need to open the internet browser and later snap on the tools
  • Afterward, go to the internet alternatives
  • Under the internet alternative, go for the high-level tab and later snap-on the reset tab
  • Then, the default settings will be applied by the internet browser
  • At last, the client needs to tap on the OK tab and afterward reboot the system

Final Words:

On the off chance that you discover any bother in playing out the steps in the appropriate way or if the QuickBooks error code 12007 actually endures even in the wake of applying every one of the steps effectively. We would prescribe you to take help from the QuickBooks Bigxperts Experts team.

QuickBooks Error PS038 | Bigxperts

QuickBooks payroll update error PS038

Payroll is a fundamental component of QuickBooks, which should be routinely updated to keep away from technical glitches. In a few examples, while refreshing payroll the clients go over QuickBooks error PS038 with an error notification “You have recovered the most recent payroll update and approved your Payroll membership, we unequivocally suggest that you go online again previously (MM/DD/YY) [Error PS038]”. The error PS038 was more common in QuickBooks 2017 version which was subsequently settled in 2018 or more.

Assuming you are additionally confronting a comparative test, this guide will assist you with disposing of the problem and acquaint you with the reasons that crop up QuickBooks error code PS038.

How to Describe QuickBooks Error PS038?

QuickBooks error message PS038 shows up on the screen when a customary client attempts to send paychecks online, and the checks hang in the middle “Online to send.” The error code additionally keeps you from sending workers payroll information. The error message says, “QuickBooks payroll will not update error PS038; approve payroll membership”. Dormant payroll membership is one of the evident purposes behind the QuickBooks Desktop update error code.

QuickBooks payroll error PS038! What causes it?

  1. Outdated QuickBooks accounting software.
  2. Using an old approach to download QuickBooks payroll.
  3. A paycheck is stuck while sending online.

What Are The Primary Causes Of QuickBooks Payroll Error PS038?

Several reasons can give rise to QuickBooks error PS038, but here are some of the most significant reasons that bring forth the error while updating QuickBooks.

  • Sending Paychecks Online: The error message rolls out when a user tries to send paychecks via online mode, but the paycheck stuck “Online to send.”
  • Damaged Company File: Damage in the company files is one of the most apparent reasons for this QB error code. Infected files not only affect other QB files but can also harm the system.
  • Retrieval of Latest Payroll Update: When you recover a current QB payroll update and validate your payroll subscription, the error arises when you proceed.

What Affects The Intuit QB Error Code Leaves On Your Business Accounting?

Aside from its immediate effect on the update process, QuickBooks error PS038 additionally leaves a few other negative effects on your business accounting.

  • Degraded Windows Performance: This is a prompt effect of the QuickBooks update error with a similar code, and as soon the error happens, it crashes a functioning window. It additionally brings down the processing velocity and increases the timing of the undertaking consummation.
  • Interrupted Payroll Update Process: With the appearance of the error, your payroll update process gets interrupted, and you will be unable to move even a single stride ahead.
  • Error in Sending Paycheck: The information inconsistencies caused because of the error makes clients take a gander at different records to check the error while handling paychecks.

Attempt these high-level measures to fix QuickBooks error PS038

Stage 1: Update existing QuickBooks to QuickBooks 2018 or later

  • Initially, dispatch the QuickBooks desktop.
  • Snap the Help tab and snap Update QuickBooks desktop.
  • Snap the Update now tab, select the updates you need to install, and afterward click Get
  • When the update finishes, close QuickBooks and reboot your computer.

Stage 2: Send Usage/Payroll data

Subsequent to updating your QuickBooks to the most recent version you will attempt to send usage or payroll data and afterward verify if the error PS038 settle or not.

  • Open QuickBooks. Go to the Employees
  • Snap My Payroll administration and afterward depending on your payroll administration either pick Send usage data or Send payroll data.
  • In the event that the payroll is sent effectively, you may attempt to update payroll again. Assuming still an error PS038 happens, head over to stage 3, and in the event that the sent remains fruitless, you should contact the QuickBooks payroll backing to get further help.

Stage 3: Identify the stuck paychecks

The most prominent reason that triggers QuickBooks error code PS038 is paycheck struck as Online to Send. In this progression, you need to determine or identify the quantity of such paychecks.

  • Open QuickBooks and go to the Edit menu and afterward click Find.
  • Presently go to the Advanced tab, find the Choose Filter segment, click Detail level.
  • Presently click Summary as it were.
  • Again in the Choose Filter segment, click Online status.
  • In the drop-down list, select the Online to Send
  • Presently click Find to see the unsent paychecks.
  • Finally, the stuck paychecks ought to show up on the screen after you run a Verify Data apparatus.

Stage 4: Run a Verify Data and Rebuild Data

  • Ensure that you have made the reinforcement of the QuickBooks organization record.
  • Presently dispatch QuickBooks and go to the File
  • Snap the utility menu and afterward click Verify data.
  • On the off chance that you see the stuck paychecks, you should run a remade data.

Steps to fix the QuickBooks Payroll error PS038 through rebuild data

  • Snap the File tab and select Utilities.
  • Presently, click Rebuild data, click Ok, and afterward click Save to make a reinforcement.
  • Snap View results once the rebuild process is finished.
  • Head over to the following segment, assuming still, an error shows up in QuickBooks.

Couldn’t move beyond the Qb payroll update error? Get uphold

Ideally, these five stages were useful for you to eliminate Frequently the clients have settled the problem by updating their QuickBooks to the most recent version without having to utilize the means – Identify the Paychecks and Rebuild Data. Notwithstanding, assuming still, you can not purpose the QuickBooks payroll update error PS038, at that point we would encourage you to connect with the QuickBooks payroll uphold group as quickly as possible. Our QuickBooks specialists will identify and investigate the reason for the problem and gives you the moderation plan. Along these lines, don’t leave your finances in question, contact the QuickBooks genius counsels now!

Ctrlr