Modulatur Value doesn’t change

Need some help!

I created an uislider. The modulator is dynamic and numeric. Moving the slider doesn’t change anything. The value stays 0!!! What is the mistake?

I use Revision = 1454, Build date = 2013-06-07 23:28:43, Branch = Nightly, Juce = 2.1.1, Boost = 1.52.0, Lua = 5.1.4

Emagic AMT8 standalone patch editor

Download
17.2 KB
3,638

This panel was made to edit the 32 standalone patches of the Emagic AMT8 midi-interface. These patches are stored inside the unit and are active whenever the interface is not running off a computer.

The panel reflects the state of the selected preset, and features an “initialise” button as found in the original Sounddiver-based editor, routing all inputs to all outputs except its own’s.

The labels displaying the port names can be edited to reflect your setup, so that instead of in/out 1… in/out 8 you can make them display the names of the devices connected to those ports. Just double-click on the name label and name it as you wish.

Currently only the routing matrix is implemented – i still have to decode the filtering matrix messages, i will add those once i figure it out.

Setup:

Select AMT0(all) as midi-output device, input can be any of the 8 ports but one has to be selected for the updating of the panel to work.

ps: I was not able to test this panel on the Unitor because i do not own one, but the messages should be the same as they share the same driver/editing software, so i am 99% sure it will work for that device aswell.

Korg DW-8000

This is a panel for the Korg DW-8000. It should also work with the rack version EX-8000 but I couldn’t test it.

If the synth’s midi output is connected to the panel’s input, the panel can receive sysex program dump data, and update its values according to the synth’s current program. There is two ways this can happen:

– if the “Load” button is clicked, the panel sends a dump request

– if the panel receives a midi program change message on the midi channel used to communicate with the synth, it will send a dump request. The synth always sends a midi program change message when a new program is selected.


The format is “compressed binary + ressources”.

Download

Six-Trak Editor

Editor for Sequential Circuits Six-Trak. It uses MIDI CC control for all available parameters including mod wheel.

Six-Trak Editor Screen


Built using CTRLR Revision 1400.

Key things needed to do on the Six-Trak before use:

– To enable changing programs (patches) by MIDI, hold Control Record and press 1.

– To enable changing parameters/mod wheel by MIDI, hold Control Record and press 4.

– The Six-Trak powers up in omni mode which is fine if it’s the only MIDI instrument you are using. If you need to change it to a specific MIDI channel, hold Track Record and press 3 to turn off omni mode. Then press Parameter then 36, then change the value to the MIDI channel of your choice.

The instructions are on the panel as well as it’s easy to forget and saves trawling through the manual every time.


Six-Trak Editor 1.1331.5 KB3,149


I used the font ‘Celtic’ for the Six-Trak logo, so it will just show in the default font if you don’t have that installed. There is a free alternative which looks very similar called Gael, you can download it here: http://www.fontspace.com/thomas-e-harvey/gael

The Six-Trak is unable to send parameter data via MIDI, so the Editor will not be able to update changes. It can send/receive program changes and mod wheel data however, so they can update on the Editor if the settings are right. See page 65 of the manual for more info.

It would be great if someone could figure out how to make a patch library. This is beyond my knowledge, so hopefully someone else can take this on. If anyone wants to add features to the panel, be my guest as I will not make any updates. The manual can be seen here (MIDI implementation starts on page 57):

http://soundprogramming.net/manuals/SequentialCircuits_SixTrak_Manual.pdf

DEMO – Panels

This is a placeholder for all the DEMO panels included in the Ctrlr installation. Those panels showcase some of the features in Ctrlr. Since we often reference them in the forums i thought i’d put them here with a link to the always current version of them (they’re store in a SVN repository so whenever i change something it gets reflected there).

The files are always available here: http://svn.code.sf.net/p/ctrlrv4/code/nightly/Panels/

Yamaha TX7 (beta)

IMPORTANT!

On January 21, 2016 I have published a new version of this panel (and also another one compatible with a DX7), so you better download that one!

I will keep the Yamaha TX7 (beta) panel available for a while, until the new version works as expected. But then I will delete it.

———————————————————————————————————————————————–

This is a beta release of a patch editor for the Yamaha TX7 sound module, the companion of the Yamaha DX7.

Basically all parameters of a preset are present in this editor, but there are still a few midi capabilities of this device left that need to be implemented. A few remarks ( and probably I will forget some) on why this is a beta release still:

  • Saving of a preset not (yet) possible. I’m afraid presets need to be stored in (and loaded from) a separate file on the computer. Have to figure out how to do this in Lua (with somebodies help?);
  • When clicking for the second time on the “get perf.” button (with the same voice present) the values of the wheel -, foot -, aftertouch – and breath sensitivity change again, probably back to some default value. I don’t know why this happens;
  • Still unclear to me how to get the right on/off setting of the modulation section (wheel – , foot – , aftertouch – and breath control buttons) when they receive their assigned parameter value;
  • The layout of the panel needs some more work.

So please use this panel freely and send me your comments or Lua-scripts so I (or we…) can improve this panel!

Download 2,375

Waldorf Microwave II / XT / XTk editor – monstrumWave 2.9

Waldorf Microwave II/XT/XTk editor

This is a limited demo version of monstrumMedia’s Waldorf Microwave II/XT/XTK editor. There’s on-screen control for literally every single editable parameter on the synth, including a wavetable and waveform editor. Also unique to this editor is an x-y editor for the free envelope and wave envelope which allows you to edit both time and level parameters by dragging the visual envelope editor. Alternatively you can simply adjust the time/level knobs in the editor to edit each parameter individually as on the physical synth.
While the layout of the editor might be overwhelming at first, you’ll quickly recognize the layout is very similar to the rack version of the XT. A quick glance at the sysex pages in the back of your microwave II/XT/XTk manual and you’ll recognize there are only about 1/4th of the synths editable parameters available through the dedicated knobs on the actual physical synth. With this editor, there’s no need to page through submenus to quickly adjust mod matrix assignments or arpeggitor settings.

Demo limitations include: (All fully featured in the full version)

*No parameters will update to current settings on synth on program changes
*No wavetable editor
*No waveform editor
*No panel reset/initiate
*No program – or + buttons
*Program names will not be displayed in the editor GUI

Many visual cues were implemented to make the editor as usable as possible, and you’ll likely find you gain a whole new understanding of some of what this synth is capable of doing at a much quicker pace than previously possible.

monstrumWave is essential for sound designing with this synth series.

Get the FULL version of this editor here

Or you can grab this stripped down demo and try before you buy:

Windows / Linux Demo Mac OS Demo

Note: This demo includes the monstrumwave demo panel, the upcoming monstrumWave 3.0 manual in PDF format as well as recommended fonts.

RackAttack panel 1.4

ScreenShot061
An editor for the Waldorf RackAttack percussion synthesizer :

This is a panel with “all-in-one” view for this drum module

All sound  , global and program parameters are integrated  but not pattern parameters.

This panel can :

-receive global
-receive entire programs(program,24 sounds and 4 fx) from edit buffer
-receive entire programs(program,24 sounds and 4 fx) from memory
-send entire programs(program,24 sounds and 4 fx) to edit buffer
-be automated in the vst host: 0 to 1967 sound params,1968 to 2013 fx params
-record automation directly with the device
UPDATE 1.4
-Restricted instances(rev1655 based)
-tempo’s rebuilded
-fx’s rebuided (there was crashs in ctrlr when dumping program from device) sorry for that
-Frequency of oscillators
-default values when double clicking (Ini Program 1.1)
-parameter values&names not showed in the lcd labels anymore and replaced by popups when dragging knobs.
-Added CC messages for the main mixer in Native Mode , the midi channel is set by Global Channel (Omni = ch1 and 1 to 16 in respective channels ).
– vst indexes are verified , normally there is no “undefined xxx” between others params in the host

Standalone  : Set midi in and out of Ctrlr to the out/in of device
Vst : Set midi in and out of Ctrlr to the out/in device + Midi Thru/”Plugin Host -> Output Device”
Important : Don’t set ANYTHING in the host and keep your midi in/out ports EXCLUSIVELY for Ctrlr and Rackattack
Please set the SYSEX ID of the RackAttack to 0.

enjoy
vst64exe64vst32exe32

1,153 1,071 931 915 Hosted  & automated
 

GEM Real Expander

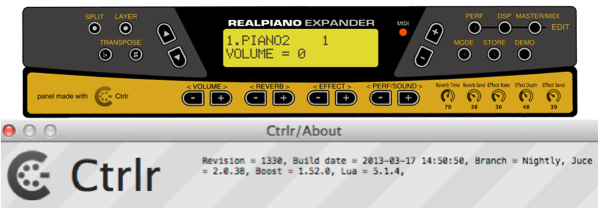
This is a panel for the GEM Real Piano Expander, a physically modeled digital half rack piano module.

General Music made the Real Expander from 1990s to 2000. They applied three physical modeling technologies: 1) natural string resonance, 2) damper physical model and 3) advanced release technology. This technology has made the Real Expander to become in my opinion one of the best sounding piano modules.

I started this as my first panel because i thought it to be easy. It doesn’t have many controls and the MIDI implementation is minimal. Soon I had the modulator part ready and the panel became a kind of remote control. To know what was going on one still had to look at the LCD-screen of the RE  and therefore the unit needs to be in sight, which is not entirely possible in my setup. So I decided to try and use the LCD-component to reflect the text on the screen of the real thing. This led me into the world of Lua scripting. The learning curve was (and still is) very steep, but I managed, be it partly. The LCD-component of this panel shows at the moment only for the buttons MODE, PERF/SOUND, VOLUME, REVERB and EFFECT to same text as the RE.

How to use this panel?

It is important you setup the Real Expander to use midi channel 3 as the common channel, midi channel 1 for sounds on layer 1 and midi channel 2 for sounds on layer 2, otherwise the LCD does not show the right text when using the mode and perf/sound buttons. Also I think it is better to first switch on the Real Expander, before starting with Ctrlr and this panel. So far I have only tested this panel in standalone mode on a Mac (OS X 10.7.5)!

MODE button
When you click on the MODE button the RE will go either into Performance mode or Sound mode. This mode change is not immediately reflected on the LCD. After you click on the + or – button of PERF/SOUND you will see the appropriate text on the LCD.

REVERB and EFFECT button
Clicking on these buttons has immediately effect for the current performance or sound(s) and the text of the setting is shown on the LCD of the panel.

VOLUME button
Same behavior as the MODE button: first click doesn’t show immediately the right text, but after a second click the appropriate text is shown. Clicking on – or + changes the volume.

DSP button
After you click on this button you can use the sliders Reverb Time, Reverb Send, Effect Send, Effect Depth and Effect Send to set the desired value for these items. The setting is not reflected on the LCD, so look at the screen of the RE itself.

STORE button
This button shows a dialog window asking you to confirm the storage of the current performance. Clicking OK stores the current settings for the performance, always using the original (factory) name of the performance! (At this stage of my knowledge of Ctrlr and Lua it is too hard for me to write a script that stores customized names in a file and reads them back in the panel (and in the RE) with all the right settings.)

All other buttons are operational, but for these you have to look at the screen of the RE to get visual feedback of what you’re doing.

So all in all this panel (which basically mimics the physical device fairly accurate but still needs to be perfected) was a tough exercise for me to become familiar with the world of Ctrlr and Lua, and without the help of ‘atom’  and the answers found on this forum I’m pretty sure I couldn’t have done it! With all the things I have learned for sure the next panel will be much easier and less time consuming to develop. Have fun and please post your comments!

download size: 1.2 MB

number of downloads: 1,365

Download


JX8Programmer V2.2

Midi Editor for the Roland JX-8P synth.


Tested on Ctrlr Nightly version 1326


Functions:

Editor will update after Tone Select (on synth)

Save Patch to Synth (Internal & Cartridge memory locations)

Load & save Patch to disk ((.syx) you can load your old or downloaded sounds)

Edit Patch name in Editor LCD (use CAPS only!)


HAVE FUN!


(minor issue:The Key-Mode slider in the Editor doesn’t update normal. (Synth to Editor only))

Download2,763

Ctrlr