Run this program from within the Ctrlr program itself. Download a copy of 5.3.201 for Windows/Linux or 5.3.198 for MacOS. and load this program into Ctrlr. This can be done from within a DAW too, by loading this panel into the VST version of Ctrlr, which will have been preinstalled into your VST folder.
Go to :: File » Open Panel
SEPARATE TO CTRLR
It is also possible to compile and run this program as a separate standalone program or VST/AU .
STANDALONE INSTANCE
Open this program from within the Ctrlr program.
Go to :: File » Open Panel
Go to :: Panel » Panel Mode. Change the Canvas Bonds last number of four from 224 to 248※
Then Go to :: File » Export » Export Restricted Instance.
VST/AU Component INSTANCE
Open this program from within the Ctrlr VST/AU program within your DAW.
Go to :: File » Open Panel
Go to :: Panel » Panel Mode. Change the Canvas Bonds last number of four from 224 to 248※
Then Go to :: File » Export » Export Restricted Instance.
※ Workaround/Bug Fix :: To build as standalone executable on Windows or export as VST, please add 24 pixels to the panel height before exporting.. (otherwise you will find the bottom 24 pixels have been truncated).
Version 5.0
07/16/2021
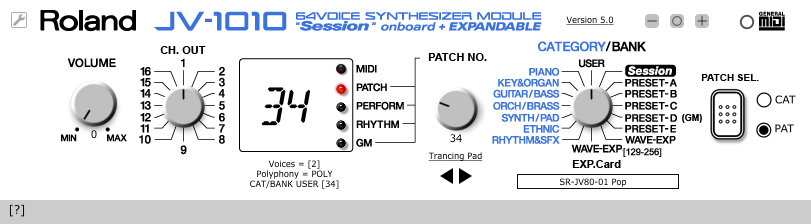
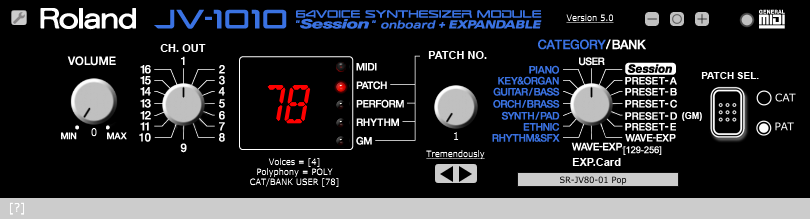
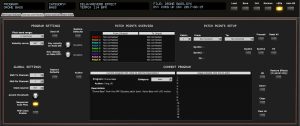
Roland JV-1010 Editor
This panel is a basic patch selector for the Roland JV-1010.
5/16/2021 In versions below 0.97.1 the panel crashes when user changes any TONE MODIFY button is pressed on the Juno itself.
3/19/2021 In versions 0.45 and below, reloading of values from saved single files and dumps; DCO_ENV_MODE in bulk dumps was incorrect. It seems one of the dummy bytes in the 32 byte message is sometimes/always set to 01. I mistakenly presumed it would be set to 00.Please download the latest version version 0.97.1, which addresses these issues.
If there are no images visible, or previous version images are showing after installing a new version of this program:
MacOS ※ — delete folder Library/Preferences/Juno Alpha/ and restart program.
WINDOWS ※ — delete folder C:Users%USERNAME%AppDataRoamingJuno Alpha and restart program. @RD /S /Q “C:Users%USERNAME%AppDataRoamingJuno Alpha”
When saving custom cc ⇒ sysex mapping to file under Linux and MacOS be sure to add extension .JUMP to end of filename.
Workaround/Bug Fix :: To build as standalone executable on Windows or export as VST, please add 24 pixels to the panel height before exporting.. (otherwise you will find the bottom 24 pixels have been truncated).
And make sure in your Preferences, Audio – MIDI Devices, you have it set so that your MIDI Device which connects to the “Juno Synth” is enabled for input, output, and control messages (right-click).
How to connect computer (panel) to Juno
HOW TO CONNECT COMPUTER TO JUNO
How to run this program.
USING CTRLR
Run this program from within the Ctrlr program itself. Download a copy of 5.3.201 for Windows/Linux or 5.3.198 for MacOS. and load this program into Ctrlr. This can be done from within a DAW too, by loading this panel into the VST version of Ctrlr, which will have been preinstalled into your VST folder.
Go to :: File » Open Panel
SEPARATE TO CTRLR
It is also possible to compile and run this program as a separate standalone program or VST/AU .
STANDALONE INSTANCE
Open this program from within the Ctrlr program.
Go to :: File » Open Panel
Go to :: Panel » Panel Mode. Change the Canvas Bonds last number of four from 630 to 654※
Then Go to :: File » Export » Export Restricted Instance.
VST/AU Component INSTANCE
Open this program from within the Ctrlr VST/AU program within your DAW.
Go to :: File » Open Panel
Go to :: Panel » Panel Mode. Change the Canvas Bonds last number of four from 630 to 654※
Then Go to :: File » Export » Export Restricted Instance.
Pre compiled files are available on SourceForge.
※ Workaround/Bug Fix :: To build as standalone executable on Windows or export as VST, please add 24 pixels to the panel height before exporting.. (otherwise you will find the bottom 24 pixels have been truncated).
With thanks to Tedjuh for valued input and suggestions.
Also thanks to http://llamamusic.com/mks50/
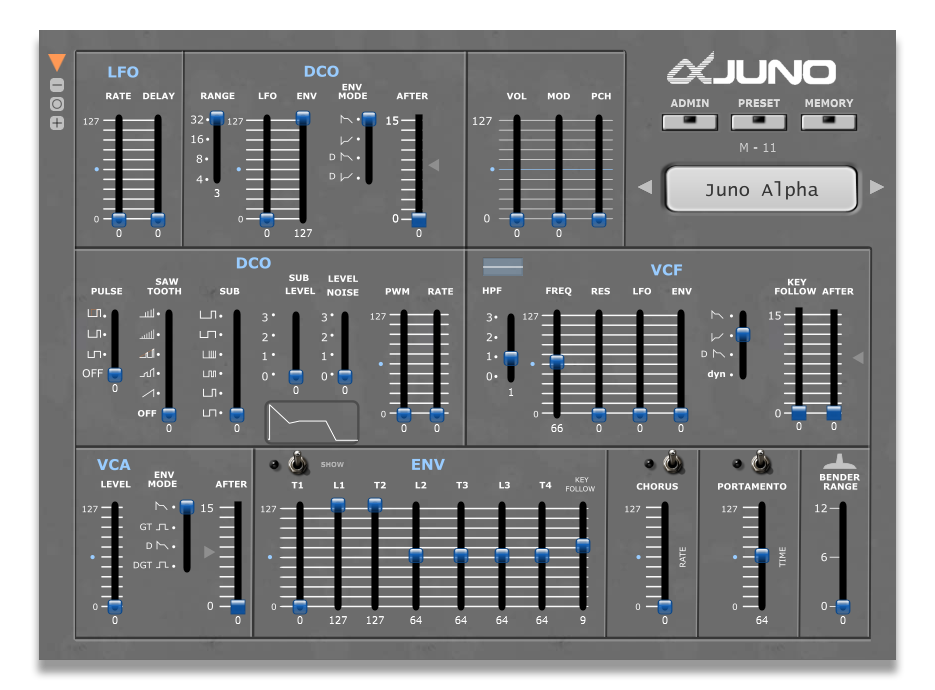
Main page
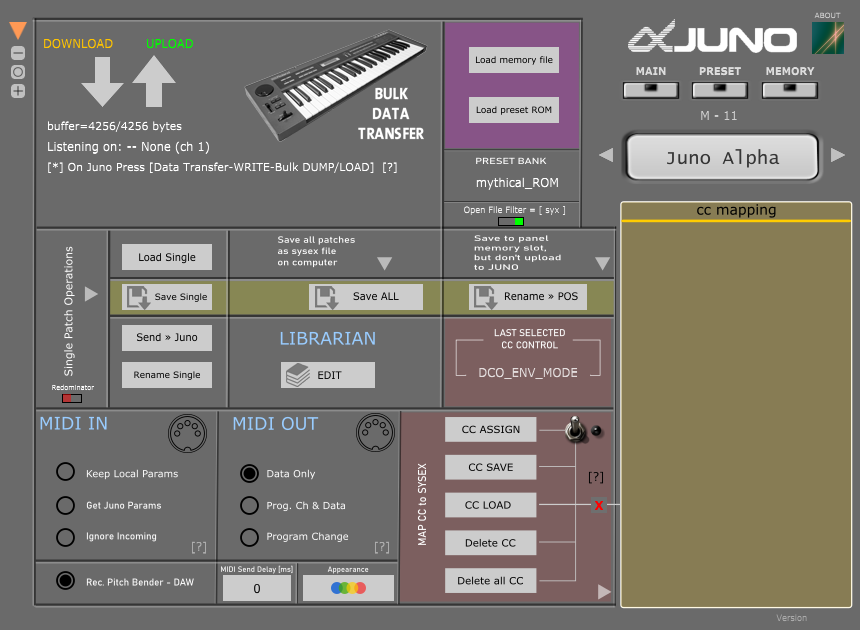
Admin (sysex dump)
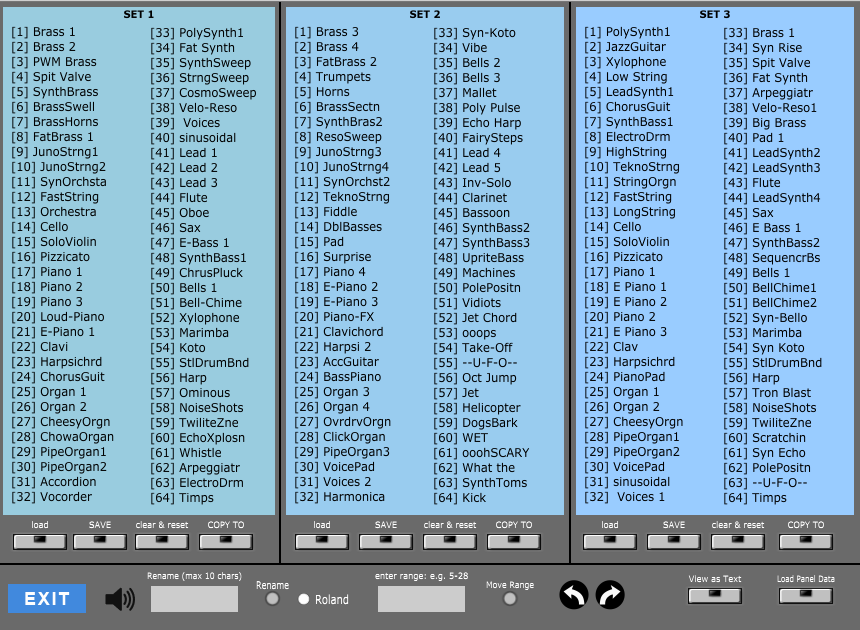
Librarian
cc -> sysex mapping
Custom Styling page
FEATURES
Download BULK DUMP from Juno to panel.
Upload BULK DUMP to Juno.
Save BULK DUMP to disk from panel.
Load BULK DUMP sysex files from Disk to panel.
Load/save single patch files and send to Juno
cc ⇒ SYSEX mapping (Use MIDI controller to change values on panel/JUNO)‡
VST indexing for automation of most JUNO parameters including MODULATION and PITCH BENDER
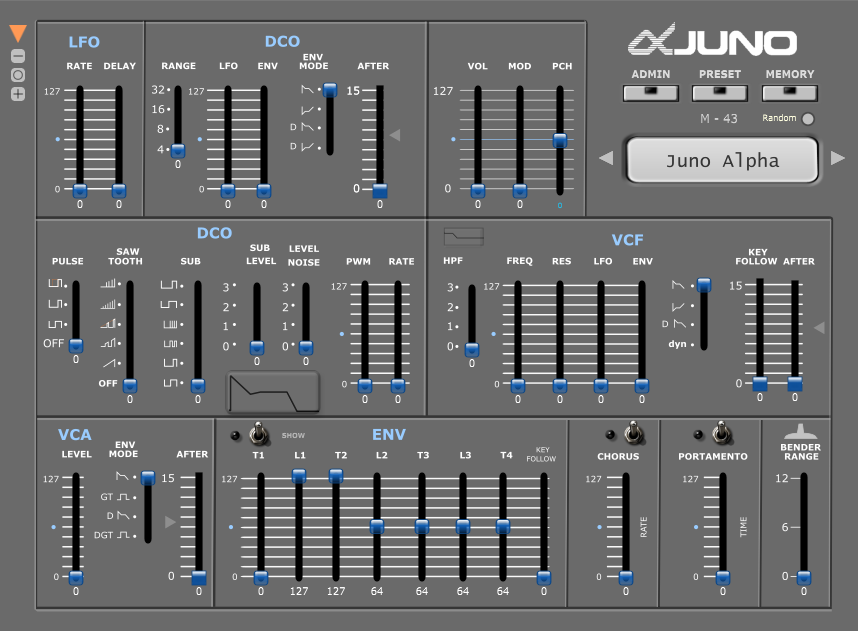
Visual representation of EG Envelope.
Change basic panel button colours, background etc.
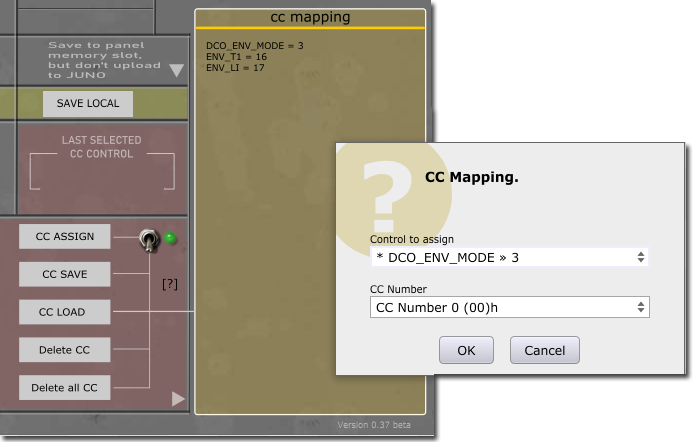
CC ⇒ SYSEX Mapping ‡
Ctrlr – Connect your MIDI->Input/Output to the same in/out as on the JUNO.
Ctrlr – Connect MIDI->Controller MIDI to your MIDI Controller keyboard.
On your MIDI Controller keyboard assign a slider/knob to a cc # 0-127
In the Admin area of the panel, switch on cc mapping
Select which control on the panel you want to associate with the CC# you assigned on your hardware controller!
BULK DUMP/LOAD PROCEDURE
1) Connect MIDI OUT and MIDI IN cables between the Alpha Juno and the computer
2) Set the MEMORY PROTECT SWITCH on the back of the keyboard to the OFF position
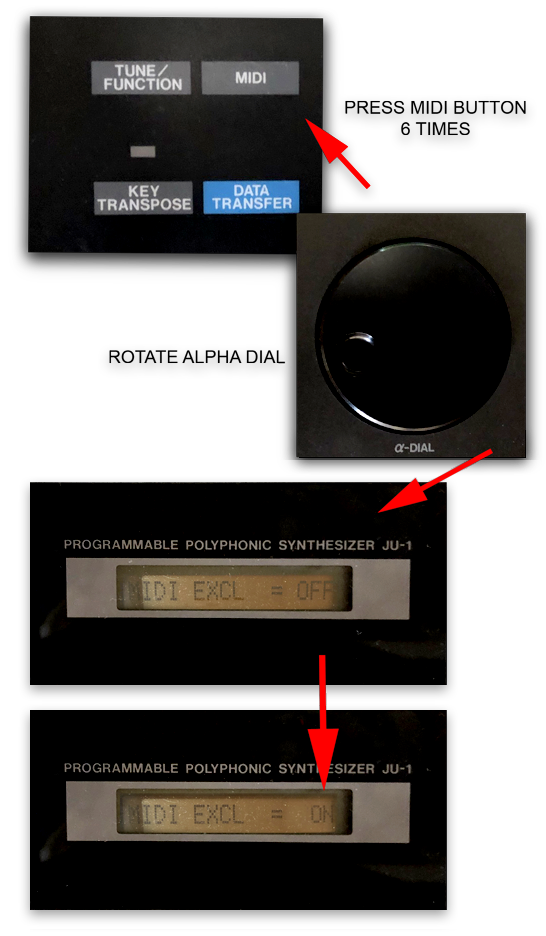
3) Press [ MIDI ] and the display will read MIDI CH = #
4) Turn the Alpha-Dial until all of the settings look like this:
MIDI CHANNEL= 1
MIDI OMNI = OFF
MIDI LOCAL = ON
MIDI AFTER = ON
MIDI BENDER = ON
MIDI EXCL = ON
MIDI HOLD = ON
MIDI PROG C = ON
MIDI VOLUME = ON
MIDI PORTA = ON
5) The BULK DUMP data transfer methods used are different from the
instructions listed in the Alpha Juno-1/2 Owner's Manual.
You must press the WRITE key at the same time as the DATA TRANSFER and
BULK DUMP keys are pressed.
6) The method for BULK LOAD data transfer used in this
manner should read in the Alpha Juno-1/2 display window as;
Bulk Load MIDI.o <==== Correct
as opposed to the normal display of:
Bulk Load MIDI.. <==== Incorrect
* The easiest way is to use these three keys at the same time
* is to first press the DATA TRANSFER key and then, while still pressing
* DATA TRANSFER, press the WRITE key and while still pressing these two
* keys, press the BULK DUMP key or BULK LOAD key.
Running as VST under Cubase
In Cubase, Disable †Midi-in **Midi-out ports to the Synthesizer (Juno Alpha).
Open the Juno Alpha VST in an instrument track IN=(All Midi Inputs)
Create Midi track IN=(All Midi Inputs) OUT=(Synthesizer Midi-in) (I record midi notes & data to this track).
In the VST Ctrlr panel connect to the †Midi-in and **Midi-out ~ connected to Synth (you disabled them in Cubase ( See step #1)).
I found the only Midi-thru setting that needs to be checked was MIDI→Midi Thru→”Plugin-host->Output Device” (The 5th option down in the fold out menu)
Version 0.98 ※ 05/16/2021 [1] Fixed crash when user presses TONE MODIFY buttons on Juno [2] Rewrite saveState. *With thanks to Jeroen for reporting this error.
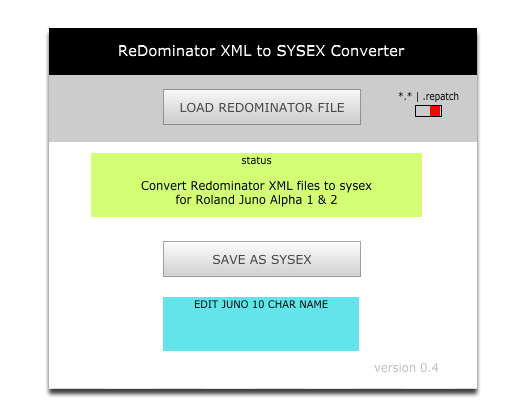
Version 0.97 ※ 05/07/2021 [1] Load Single file to Librarian [2] Random Patch Generator auto name generation [3] Save/load/view patch parameters as text [4] Load Redominator XML Patch files. (.repatch) [5] Change load/Save file extensions. [6] Audition any patch in Librarian. [7] Global MIDI message delay option (added in version 0.97.1) *With thanks to Tedjuh for testing of the Librarian.
Version 0.96 ※ 04/26/2021 [1] Added Librarian [2] Random Patch Generator *With thanks to Tedjuh for testing of the Librarian.
Version 0.95 ※ 04/05/2021 [1] Added graphics elements [2] DAW Recording of PitchBend/Modulation [3] Various code fixes
Version 0.90 ※ 03/26/2021 [1] Some values were not saving correctly in bulk dump file: [2] Complete re-write of byte message parsing. [3] Added customisation for graph colours. [4] added mini EG graph on main page and HPF legend. [*] Many Thanks to @Cowudders for testing and bug spotting.
Version 0.45 ※ 02/14/2021 [1] All ENV Modes were sending inverted CC Values: [*] any files you have saved using version 0.44 will now have inverted values for all three ENV MODE switches! So you might need to reload the files and adjust each value and re save. [*] Thanks to @Cowudders for spotting this!
Version 0.44 ※ 12/16/2020 [1] save state for cc-sysex mapping switch
Version 0.43 ※ 12/16/2020 [1] Fixed VST/standalone initialisation errors on startup [2] Multiple wallpaper selection
Version 0.40 ※ 11/27/2020 [1] Added panel styling customisation. [2] Various stylistic changes.
Version 0.39 ※ 11/23/2020 [1] Fixed next/previous menu selection initialisation bug [2] Changed image directory cache folder.
Version 0.38 beta ※ 11/23/2020 [1] Fixed next/previous menu selection [2] Added MIDI selection in Admin area. [3] Choose between how program changes update data on the Juno
This panel is for developers wishing to add radio buttons using png images to a panel. uiComponent and mouse detection functions are generated to console for cutting and pasting into a project.
First initialise images (and text) Click on areas [1] [2] [3]
Images must be loaded as resources.
 If you use custom fonts, another user may not have the same fonts on their system.
	On Windows 10 any fonts installed in c:WINDOWSFonts should load, but custom fonts seem not to.
	You can include the font as a resource in a panel you release, but I am not sure if that works on
	every platform.
(1) First import image/font resources into this panel.
(2) Import one image for 'off state' and a separate image for 'on state' with same dimensions.
(3) Generate code by clicking on "print code to console"
(Open the `console` window first and clear any previous messages)
In your panel:
(A) Create a  uiComponent** add a function with any name to 'Paint callback' field e.g.myPaintCallback"
(B) Create a mouseDown function in the uiComponent** in  'Mouse down callback'
(C) Create a mouseMove function in the uiComponent** in  'Mouse move callback'
(D) In 'Resources' add 2 png images of the same size, one for "off state" and one for "on state"
	*Load the exact same images (and custom fonts) used in this program.
Example of a radio button set generated by this program.
Creating Radio Buttons separate to this program
Radio Buttons can also be created using code such as below, where the lua table t{} contains the names of the buttons in the radio group
ProgramSelect = function(--[[ CtrlrModulator --]] mod --[[ number --]], value --[[ number --]], source)
    if source == 4 then
        local sName = L(mod:getName())
        local t = {"PROGRAM01", "PROGRAM02", "PROGRAM03", "PROGRAM04"} -- local table of 4 radio buttons
        for i, v in pairs(t) do
            if sName == v then
                local sysMess = string.format("F0 00 00 23 01 43 C1 00 %.2X F7", i - 1)
                panel:sendMidiMessageNow(CtrlrMidiMessage(sysMess))
            else
                _G[v]:setValue(0, true)
               -- don't use panel:getComponent(v) // use panel:getModulatorByName(v)
            end
        end
    end
end -- source == 4 (user clicked on a button - not lua generated - that would be 5 or 6) end
--[[
*NOTE: Where PROGRAM01 etc are initialised in an init script
"Called when the panel has finished loading"
PROGRAM01=panel:getModulatorByName("PROGRAM01")
PROGRAM02=panel:getModulatorByName("PROGRAM02")
PROGRAM03=panel:getModulatorByName("PROGRAM03")
PROGRAM04=panel:getModulatorByName("PROGRAM04")
--]]
With thanks to Tedjuh for assistance and comments in the development of this panel.
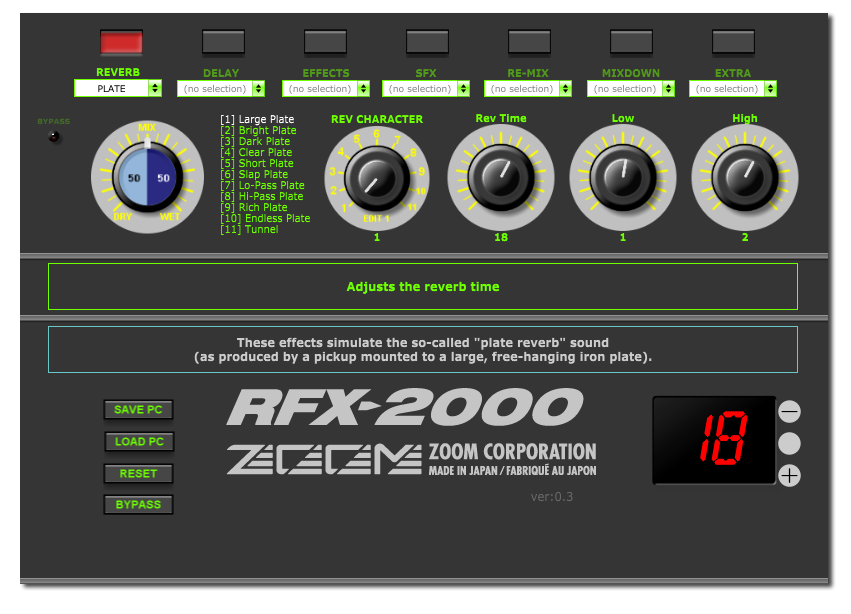
Version 1.0 ※ 10/22/2020
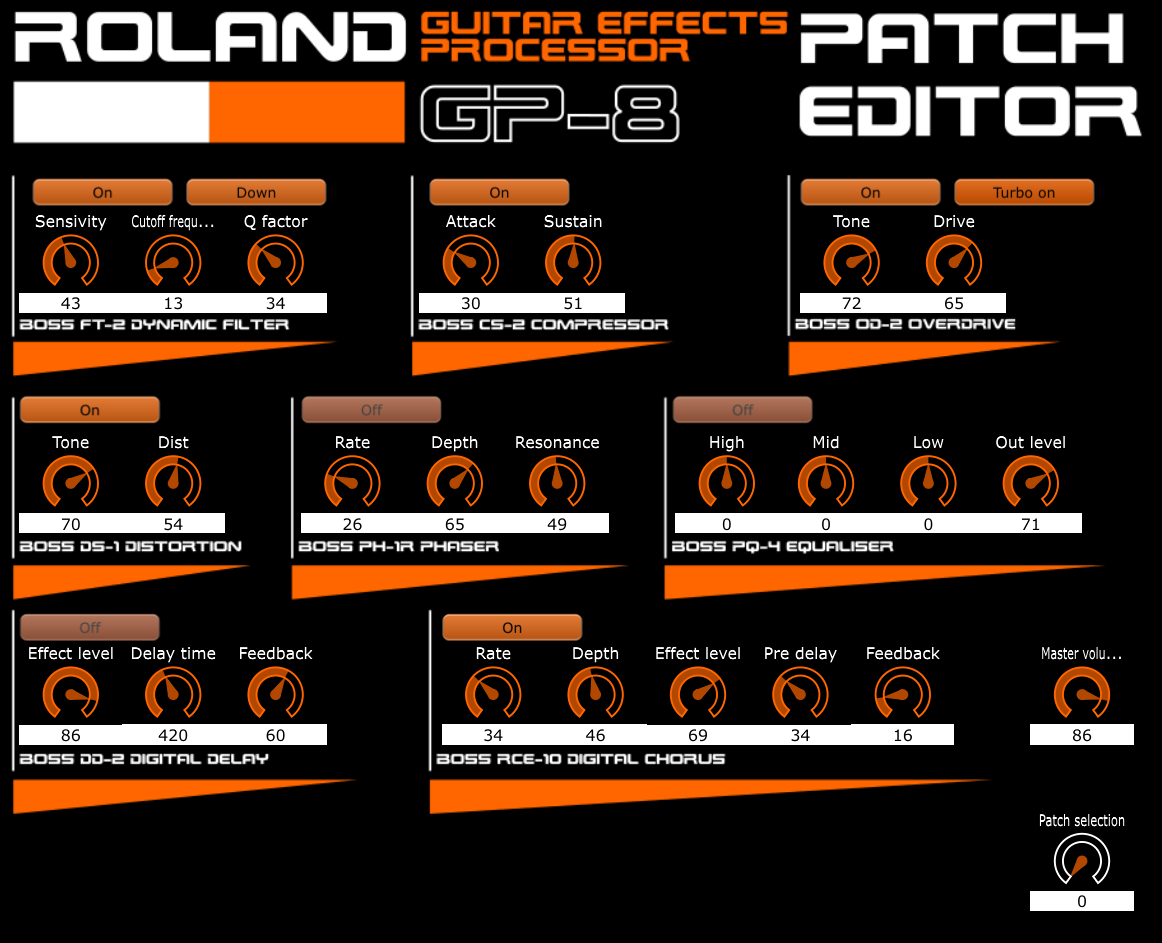
Editor for Zoom RFX-2000 multi effects rack unit. Includes full access to the hidden “EXTRA” effects inaccessible through the unit interface. †
Changes to parameters can be saved to disk and reimported to panel.
Changes to parameters are saved in memory on reload.
How to run this program.
This program needs to be run from within the Ctrlr program itself. Download a copy of 5.3.201 for Windows/Linux or 5.3.198 for MacOS. and load this program into Ctrlr. This can be done from within a DAW too, by loading this panel into the VST version of Ctrlr, which will have been preinstalled into your VST folder.
[1] Go to :: File » Open Panel
VST or STANDALONE INSTANCE
It is also possible to run this program as a separate standalone executable or VST .
[1] Open this program from within the Ctrlr program [2] Go to :: Panel » Panel Mode. Change the height of the panel from 571 to 595 (See below) [3] Then go to File -> Export -> Export Restricted Instance.
※ Workaround/Bug Fix :: To build as standalone executable on Windows or export as VST, please add 24 pixels to the panel height before exporting. (otherwise you will find the bottom 24 pixels have been truncated).2
† MULTI EFX page
CHANGELOG:
Version: 0.1 beta ※ 10/09/2020 Version: 0.2 beta ※ removed dev code 10/10/2020 Version: 0.3 ※ removed dev code 10/11/2020
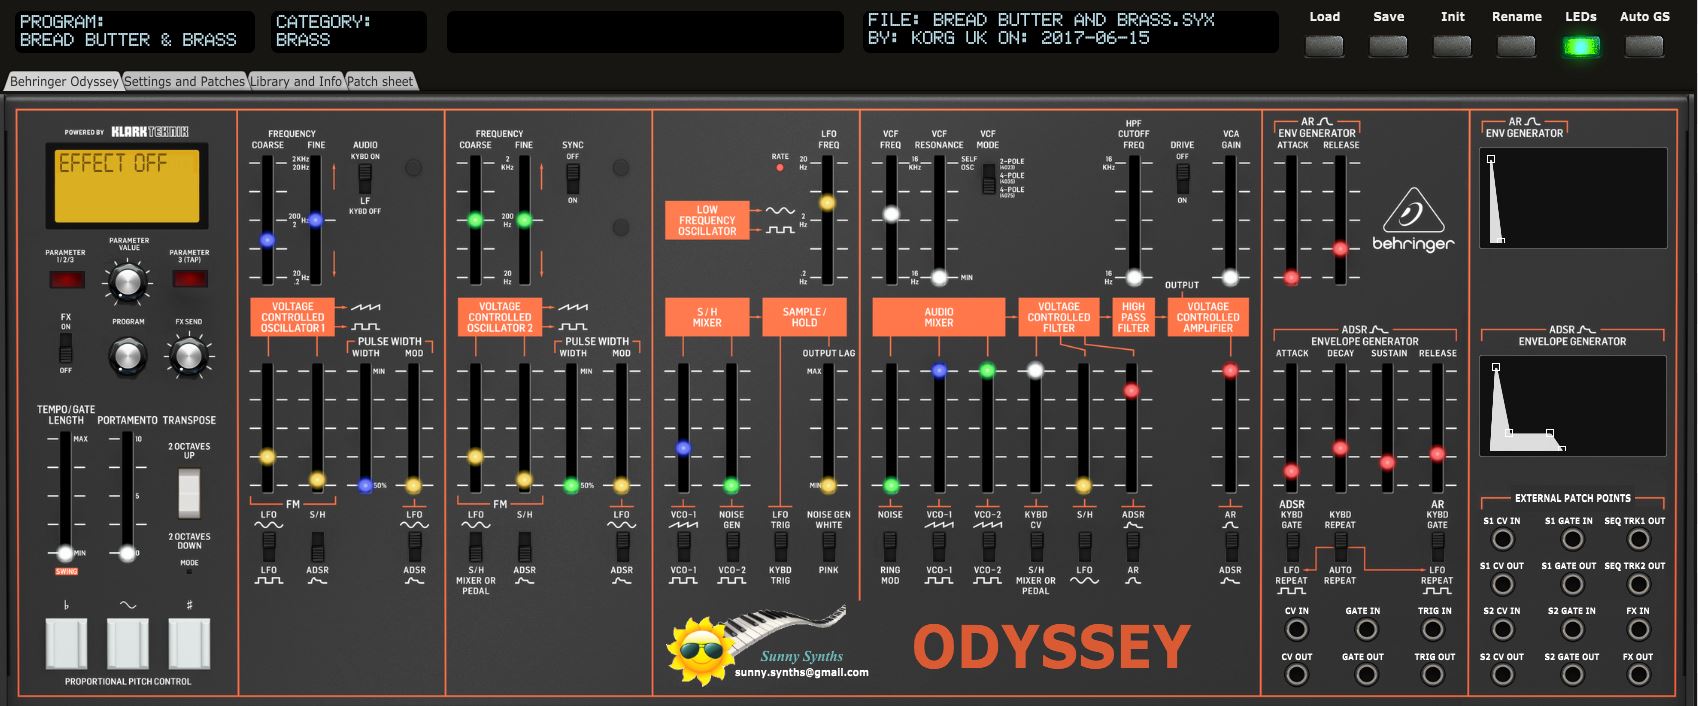
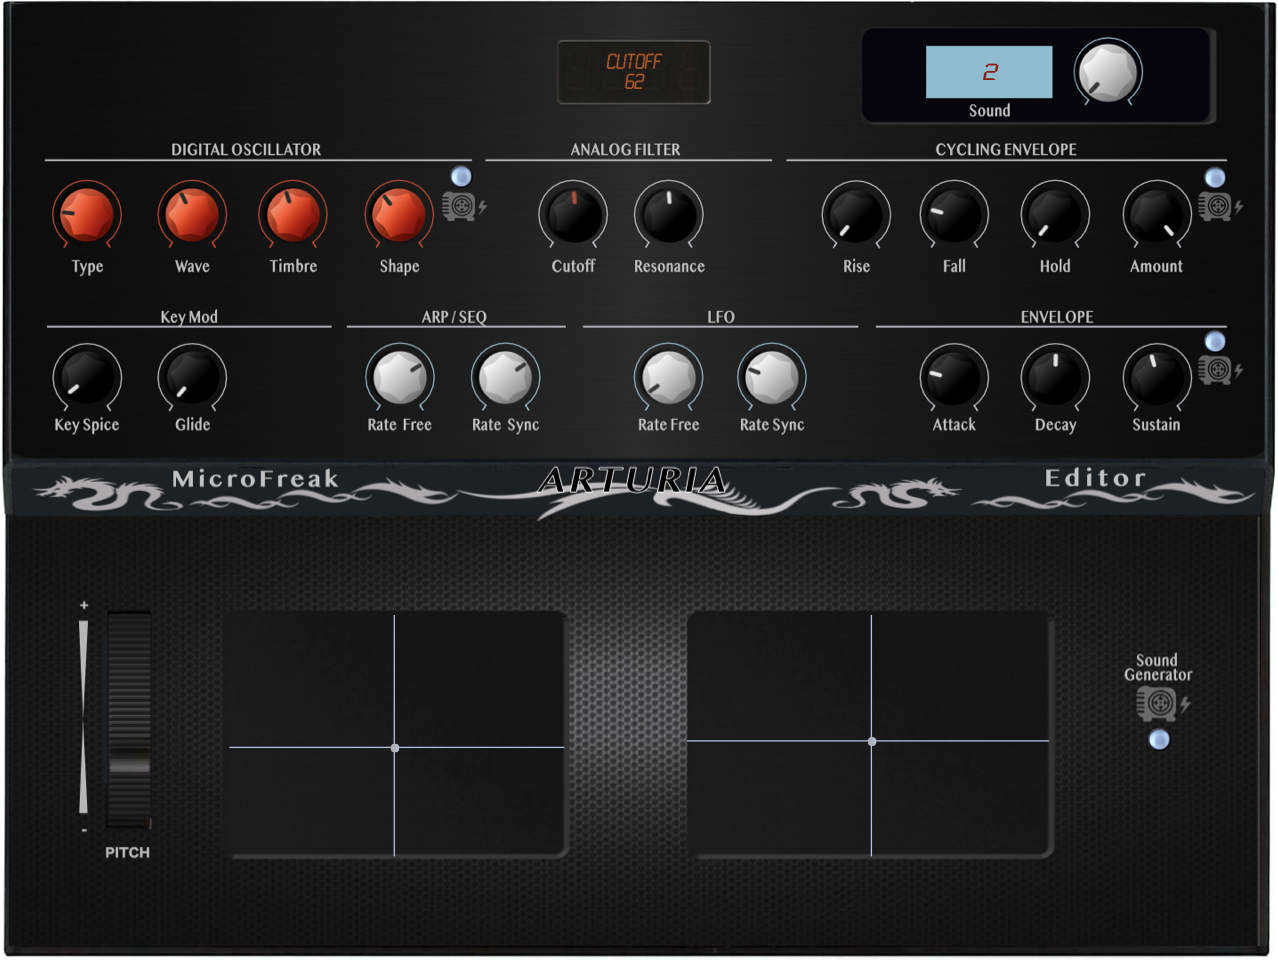
This panel is only a patch loader/saver on computer as the Behringer Odyssey does not support the load/save of programs or the manipulation of program parameters by Midi NRPN/CC messages except for Global settings that can be transferred to the Odyssey synth.
It can thus also be called a “patch mapper”.
Features:
Behringer Odyssey patch saver/loader for PC and Mac
Interface with same look as actual synthesizer
Top row of support “screens” with old look
Simple sliders or sliders with white or color LEDs (v1.1)
Ability to view and select any effect and adjust its 3 parameters according to the actual synth
Envelopes graphs handled by mouse or the AR/ADSR sliders
Load / Save programs from individual .syx files
Easy program renaming
Display and export of program parameters as text file
Ability to describe 9 input/output patch cables with different sources/destinations
Programs have a name, author, save date and description. They can be associated to a category
Ability to describe the usage of each program in a step by step mode (up to 15 steps)
Browser of the files on the disk
Patch sheet tab with patch sheet for Odyssey and other gear (external synths/sequencer/FX chain)
Patch cables (9 colors)
Display of current precise parameter value when moving sliders
Program settings management with automatic/manual send to the Odyssey synth
Global settings management with automatic send to the Odyssey synth (as Behringer Synthtool)
Panel zoom with memory
Automatic reading of wav files associated to a patch
Manual/Automatic reading of any wav file
Standalone versions for PC and Mac
VST versions for PC (32 and 64 bits)
VST and AU versions for Mac
All buttons associated to a Midi CC controller number so you can adjust them from a hardware controller (still no impact on the synth of course and unfortunately)
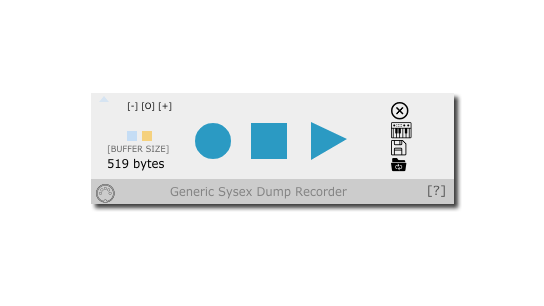
Record incoming Sysex messages, bulk dumps etc from MIDI device.
Should work on any MIDI device.
This panel can re-send Sysex back to MIDI device and save sysex to file and load sysex from file to be resent back to MIDI device.
You can also insert a custom dump request command.
Sysex dumps are retained in memory across sessions.
Custom editing of sysex message possible.
How to run this program.
This program needs to be run from within the Ctrlr program itself. Download a copy of 5.3.201 for Windows/Linux or 5.3.198 for MacOS. and load this program into Ctrlr. This can be done from within a DAW too, by loading this panel into the VST version of Ctrlr, which will have been preinstalled into your VST folder.
[1] Go to :: File » Open Panel
VST or STANDALONE INSTANCE
It is also possible to run this program as a separate standalone executable or VST .
[1] Open this program from within the Ctrlr program [2] Go to :: Panel » Panel Mode. Change the height of the panel to 135 (See below) [3] Then go to File -> Export -> Export Restricted Instance.
※ Workaround/Bug Fix :: To build as standalone executable on Windows or export as VST, please add 24 pixels to the panel height before exporting. (otherwise you will find the bottom 24 pixels have been truncated).